Chat kit
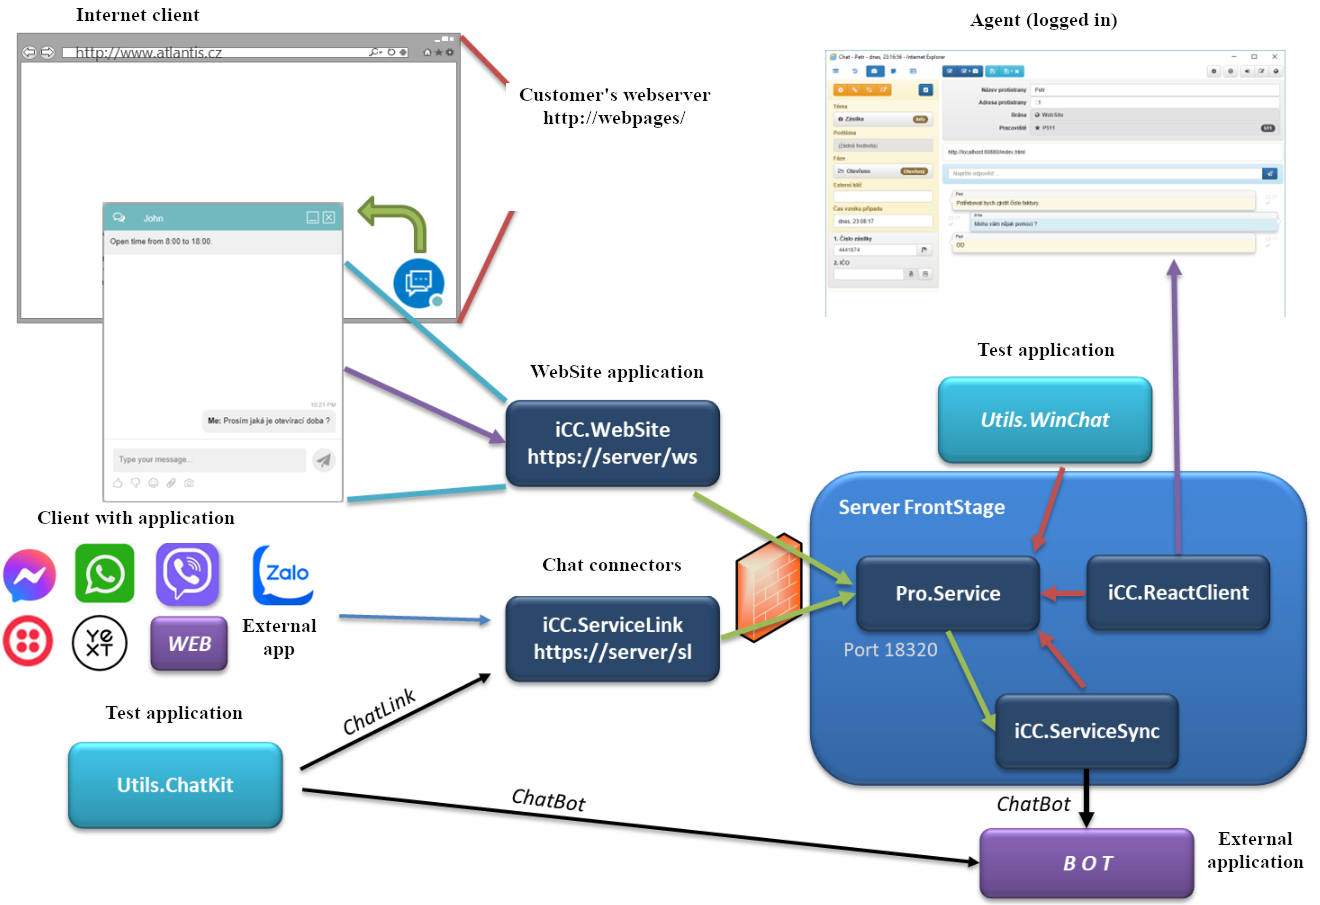
The utility allows you to emulate and test external ChatLink and ChatBot connections to the FrontStage contact center system (FS).
Installation
Your consultant will provide the utility in the form of a ZIP file on request. Simply extract the contents of the ZIP file to a suitable folder on your computer. The Utils.ChatKit.exe file will be launched. You do not need to configure the application further.
Important
ChatKit can only run on Windows with .NET Desktop Runtime 8 installed, which can be downloaded from the official site
Connection types
Two types of connections are needed for chat needs:
Connecting an external chat application towards FS –>
ChatLinkConnecting FS to external chatbot –>
ChatBot
Although both types of connection use the same message format, their purpose differs. The ChatLink connection is used throughout the connection and mediates chat for clients (public, non-FS) with the contact center, both with agents and ICR automated agents or chatbots. The ChatBot connection is used by the FS if it needs to use a chatbot’s services during the ICR automated service.
The basis is the transfer of messages in JSON format as described in the iCC-WebSite API.docx documentation.
Messages can be transmitted by transport protocols:
Transport principle |
Open |
Encrypted |
|---|---|---|
HTTP Request/Response |
http |
https |
Permanent WebSocket connection |
ws |
wss |
Permanent IBot connection |
bot: |
bot: |
A single connection allows multiple chat sessions to run simultaneously - these are distinguished by the TrackingId or ChatId identifiers. However, only one connection is allowed to be established at a time for a particular URL.
ChatLink
Connection specification and connection type

Switch SB / ES - To emulate the ChatLink connector, switch to the “ES” position (emulating an external application when testing FS). The switch changes the test URL and the command palette in the “Command” menu.
URL - URL of the server for the ChatLink connection. The transport type is governed by the protocol specified (e.g. https: or wss:)
API key - application key (password) for access to HTTP connection and WebSocket
Connect - button for establishing the connection and then for terminating the connection
Text box behind the Connect button - Indication of connection status and errors
Get - transport HTTP - Request/Reply button will start receiving periodic responses from the server (polling), for WebSocket - Persistent connection is not needed
List of communications and communication history
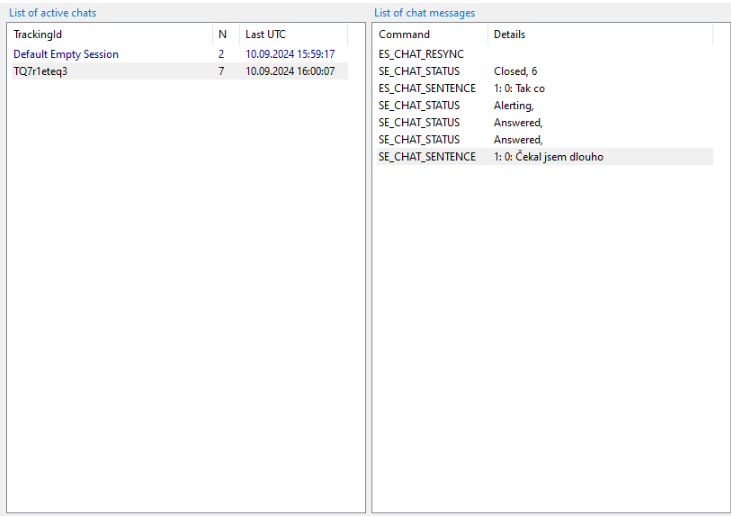
The List of active chats panel shows a list of ongoing chats (sessions), the key for resolution is the TrackingId identifier (string). The N column shows the number of messages in the session, the Last UTC column shows the time of the last message in the session. The DefaultEmptySession list item is for unaddressed ES_CHAT_REQUEST and ES_CHAT_LIST commands. Additional sessions can either be created using the Add new chat button, or after the connection is re-established, they will add themselves as registered by the server after the ES_CHAT_LIST command is sent. The Remove selected chat button allows you to remove a session entry. To use other zones, it is important which entry in the list is marked. The history of communication in the next List of chat messages panel is linked.
The List of chat messages panel lists the messages received and sent for the session (which is marked on the left). The “Command” column lists the command, the “Details” column summarizes the contents of the command. Selecting a message in the list will display that message in the communication details on the right. Commands starting with “ES” are from the external application (utility) towards the FS, and commands beginning with “SE” are from the FS towards the external application. The Full copy as JSON button can be used to get a record of the entire session in JSON format exactly as the individual messages arrived or were sent by the transport protocol, the content is copied to the clipboard as text.
Item detail
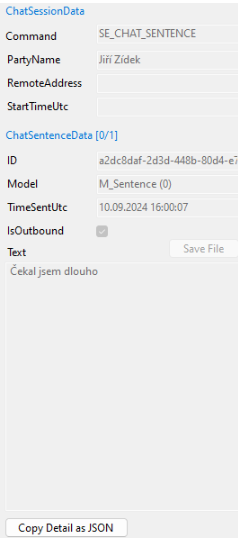
When you select an item from the communications list, its contents are displayed on the right side.
The ChatSessionData section contains information about the message wrapper:
Command - command in item
PartyName - party name
RemoteAddress - address of the public client
StartTimeUtc - if this item is filled, it specifies the session (chat) start time
The ChatSenteceData section contains information about replicas (replies) in the “Sentences” item (the first item is always displayed, the total number of items is shown after the slash):
ID - replica identifier
Model - replica model (same selector as when sending)
TimeSentUtc - time of sending the replica
IsOutbound - indicates the direction of the replica; checking means from FS to external recipient
Text - the text of the replica; depending on the model, it can be plain text or JSON formatted
Save File - for attachment models (M_Attachment, M_PictureAttached, etc.) the content of the attachment can be saved to a file
Copy Detail as Text - copies this one selected item exactly as it was transferred by the transport as JSON text to the clipboard
Commands and sending

To send a command, you need to select it from the menu; only commands for messages in the direction from the external application to the FS (i.e., starting with “ES”) are available:
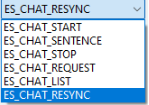
Then, values can be filled in for the PartyName, RemoteAddress, or StartTimeUtc fields. If the message transmits replicas (ES_CHAT_SENTENCE), a single entry can be specified for the replica field Sentences.
ID - replica identifier field; random IDs are autogenerated when sending a replica, but you can also enter a specific ID manually
Model - specifies how the message is interpreted and how the text field is formatted:
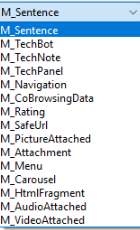
Text - under the model is the message text field, e.g., for the M_Senetence model, it contains the literal text of the replica. For attachment models (M_Attachment, M_PictureAttached etc.), it is JSON format
Open File - for attachment models (M_Attachment, M_PictureAttached, etc.), the utility can build a JSON array - text for the selected file.
Warning
Since all text is displayed in the utility, do not select files larger than 1MB.
Copy as JSON - copies the prepared message, as it will be/was sent by the transport, to the clipboard
Send - sends a message using the transport protocol and adds it to the communication history (it can be viewed again by clicking on the item in the list)
ChatBot
Switch SB / ES - To emulate the ChatBot connector, switch to “SB;” position (emulate FS behavior when testing external chatbot)
URL - URL of the server of the ChatBot connection; the transport type is governed by the specified protocol (e.g., https: or wss:); configuration of the type “Device” (IChatBot) is also possible - clicking on the title changes the connection configuration to the connection
bot:API key - application key (password) for access to HTTP and WebSocket connections
Connect - button for establishing the connection and then for terminating the connection
Text box behind the Connect button - Indication of connection status and errors
Get - for HTTP transport - Request/Response; the button starts periodic receiving of responses from the server (polling), for WebSocket - no permanent connection is needed
List of communications and communication history
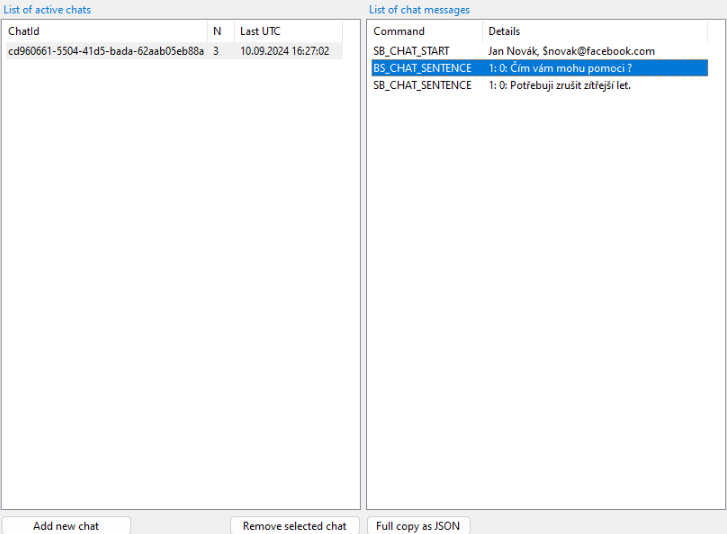
The List of active chats panel shows a list of ongoing chats (sessions), the key for differentiation is the ChatId identifier (string). The N column shows the number of messages in the session, and the Last UTC column shows the time of the last message in the session. A session can be created using the Add new chat button. The Remove selected chat button lets you delete a session entry. To use other zones, it is important which entry in the list is marked. The communication history in the next List of chat messages panel is linked.
The List of chat messages panel lists the messages received and sent for the session (marked on the left). The “Command” column lists the command, the “Details” column summarizes the contents of the command. Selecting a message in the list will display that message in the communication detail on the right. Commands starting with “SB” are from FS (from the utility) towards the bot, commands starting with “BS” are from the bot towards FS (towards the utility). The Full copy as JSON button can be used to get a record of the entire session in JSON format exactly as the individual messages arrived or were sent by the transport protocol, the contents are copied to the clipboard as text.
Item detail
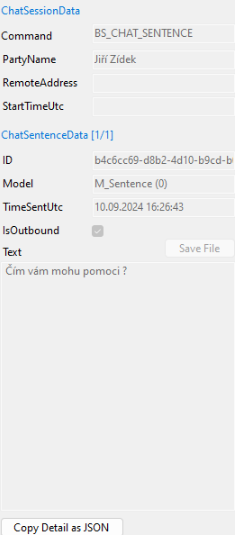
When you select an item from the communications list, its contents are displayed on the right side.
The ChatSessionData section contains information about the message wrapper:
Command - command in item
PartyName - party name
RemoteAddress - address of the public client
StartTimeUtc - if this item is filled, it specifies the session (chat) start time
The ChatSenteceData section contains information about the replicas in the Sentences entry (the first entry is always displayed, the total number of entries is listed after the slash):
ID - replica identifier
Model - replica model (same selector as when sending)
TimeSentUtc - time of sending the replica
IsOutbound - indicates the direction of the replica - when checked it means from FS to external recipient
Text - replica text - depending on the model, this can be plain text or JSON formatted.
Save File - for attachment models (M_Attachment, M_PictureAttached, etc.) the content of the attachment can be saved to a file
Copy Detail as Text - copies this one selected item, exactly as it was transported, as JSON text to the clipboard
Commands and sending

To send a command, you need to select it from the menu. Only commands for messages in the direction from FS to bot are available (i.e., starting with “SB”):

Then, values can be filled in for the PartyName, RemoteAddress, or StartTimeUtc fields. If this message carries replicas (SB_CHAT_SENTENCE), a single Sentences replica entry can be specified.
ID - replica identifier field; random IDs are autogenerated when the replica is sent, but specific IDs can be entered manually
Model - specifies how the message is interpreted and how the text field is formatted
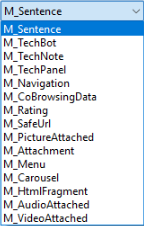
Text - under the model is the message text field, e.g., for the M_Senetence model, it contains the literal text of the replica. For attachment models (M_Attachment, M_PictureAttached etc.), it is JSON format
Open File - for attachment models (M_Attachment, M_PictureAttached, etc.), the utility can build a JSON text field for the selected file.
Warning
Since all text is displayed in the utility, do not select files larger than 1MB.
Copy as JSON - copies the prepared message, as it will be/was sent by the transport, to the clipboard
Send - sends a message using the transport protocol and adds it to the communication history (it can be viewed again by clicking on the item in the list)
Usage example
Demonstrated using the ChatLink connector.
Run the utility. Set the switch to “ES”, enter the URL and change the protocol type to
wss:, enter “API key”.
Verify that the connection type “WEBSOCKET” is correctly indicated, press Connect.
The connection status is “WEBSOCKET Created” and “Default Empty Session” has been created in the overview.

Click to highlight “Default Empty Session” and select
ES_CHAT_REQUEST
Click on the Send button.

You can see the message sent, and the reply received.

Click the Full copy as JSON button. Open the file with a suitable editor (e.g., VS Code) to view the replica structure:
{
"ChatId": "",
"Data": [
  {
      "Command": "ES_CHAT_REQUEST",
      "ChatId": null,
      "PartyName": null,
      "RemoteAddress": null,
      "UserToken": null,
      "ExtResponse": null,
      "Culture": null,
      "StartTimeUtc": null,
      "Sentences": null,
      "FormFields": null,
      "ActiveChats": null,
      "Signal": null
  },
  {
      "Command": "SE_CHAT_RESPONSE",
      "ChatId": null,
      "PartyName": null,
      "RemoteAddress": null,
      "UserToken": null,
      "ExtResponse": null,
      "Culture": null,
      "StartTimeUtc": null,
      "Sentences": null,
      "FormFields": null,
      "ActiveChats": null,
      "Signal": "Free"
  }
        ],
  "N": 2,
  "LastUtc": "2024-09-10T16:38:58.9249172Z",
  "Stale": false
}
To add another chat, use the Add new chat button. Then, click on it in the chat overview to select it.
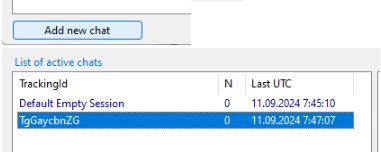
Select the
ES_CHAT_STARTcommand and send it by using the Send button.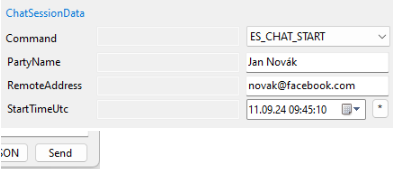
You can see the status changes sent by the FS by selecting an item to view its detail.

Click the Copy detail as JSON button. Open the file with a suitable editor (e.g., VS Code) to view the details of the selected message.
{
  "Command": "SE_CHAT_STATUS",
  "ChatId": "TgGaycbnZG",
  "PartyName": "Jiří Zídek",
  "RemoteAddress": null,
  "UserToken": null,
  "ExtResponse": null,
  "Culture": null,
  "StartTimeUtc": "2024-09-11T07:48:14.7734189Z",
  "Sentences": null,
  "FormFields": null,
  "ActiveChats": null,
  "Signal": "Alerting"
}
As an agent, you can accept chat (e.g. in ReactClient)

You will also see this information in the communication history in the utility.
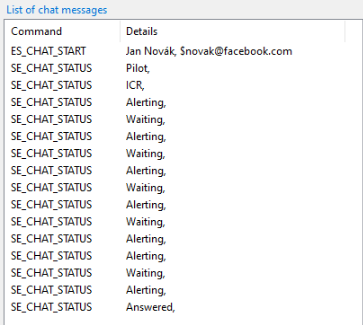
You can prepare a replica for the agent e.g. using the
ES_CHAT_SENTENCEcommand, use the Send button to send it to the application.
{
"Command": "ES_CHAT_SENTENCE",
"ChatId": "TgGaycbnZG",
"PartyName": "Jan Novák",
"RemoteAddress": null,
"UserToken": null,
"ExtResponse": null,
"Culture": null,
"StartTimeUtc": null,
"Sentences": [
    {
        "ID": "638616376926162003",
        "Text": "První zpráva.",
        "TimeSentUtc": "2024-09-11T07:53:31.6811192Z",
        "Model": 0,
        "IsOutbound": false,
        "AgentId": null
    }
],
"FormFields": null,
"ActiveChats": null,
"Signal": null
}
As an agent, pick up the message and try replying to it.

You will see your response in the utility. You can use the Copy Detail as JSON button to download its details and view it.
{
"Command": "SE_CHAT_SENTENCE",
"ChatId": "TgGaycbnZG",
"PartyName": "Jiří Zídek",
"RemoteAddress": null,
"UserToken": null,
"ExtResponse": null,
"Culture": null,
"StartTimeUtc": null,
"Sentences": [
    {
        "ID": "dd6c122a-5d62-44fc-9dcd-0c83892917b4",
        "Text": "První odpověď",
        "TimeSentUtc": "2024-09-11T07:54:43.8885791Z",
        "Model": 0,
        "IsOutbound": true,
        "AgentId": "c11741f0-5804-4a37-a1a4-bb712c117484"
    }
],
"FormFields": null,
"ActiveChats": null,
"Signal": null
}
Suppose you want to end the chat (from the external side). Select the
ES_CHAT_STOPcommand and send it.
The chat on the agent’s side has ended. The utility’s message overview allows you to generate and view the details of this action.
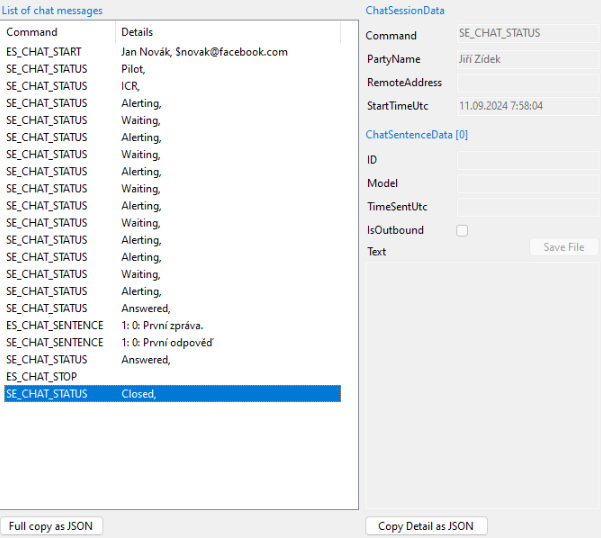
{
  "Command": "SE_CHAT_STATUS",
  "ChatId": "TgGaycbnZG",
  "PartyName": "Jiří Zídek",
  "RemoteAddress": null,
  "UserToken": null,
  "ExtResponse": null,
  "Culture": null,
  "StartTimeUtc": "2024-09-11T07:58:04.4909287Z",
  "Sentences": null,
  "FormFields": null,
  "ActiveChats": null,
  "Signal": "Closed"
}