Voice campaigns
The visual editor for Voice Campaigns is a tool for supervisors (or admins) to create parameterized campaigns, which are then distributed to available agents according to the set rules. You can fully personalize and continuously evaluate the progress of each campaign.
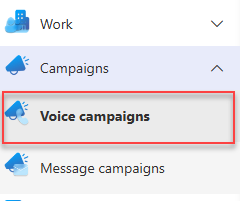
The editor can be found in the FrontStage administration, . You need the EditOutboundList permission to run the editor and ImportOutboundCall permission to import individual campaign batches.

The running editor displays a list of all available campaigns. It is filled with the result of a data query. Its ID is set in the configuration parameter OutboundListAdminQueryId. Also the parameter OutboundListAdminImportsQueryId might come in handy.
In the upper right corner there are buttons for interacting with the records:
Create - Displays a popup window to create a new campaign.
Delete - Bulk action. Deletes the marked records in the list.
Important campaign properties
Campaigns are a prescription for calling in the selected queue.
You can use the campaign status to pause the campaign when, for example, agents have too much of other workload. When they have more available capacity, you can run it again.
You can set parameters such as the maximum number of repetitions, after what time a call should be repeated when not revoked, busy and so on.
If you associate a campaign with a scenario, a form from the scenario will be displayed to the agent during the call with questions that they should ask the caller. Thus, the agent will not forget to ask anything important, and you can then further process the collected results.
You usually import calls to a campaign from a CSV file, but you can also get them there using different methods, such as via an API call from an external system, from an IVR step, etc.
When importing a CSV file, you can pre-populate some responses to the scenario. The agent can thus confirm with the caller that the information such as the address is still valid and so on.
You can track how many calls remain to be processed and download the call results as a CSV file for further processing.
Quotas can automatically end your campaign. For example, during a survey you can set a quota indicating that once you have called at least 75% of men of working age, the campaign can end.
How does it work?
Create a campaign and set its parameters on the Detail tab.
Import a file with recipients on the Voice Campaign Imports tab, optionally set import parameters.
If you want agents to collect results, create/apply a scenario and link it to your campaign.
Switch the campaign to the “Started” state.
For a specific import from the Campaigns Imports tab, start the calling.
Calls are offered to agents. Campaign statistics are calculated.
The campaign exhausts all calls and switches to the “Completed” state.
Campaign management
Detail tab
Name - Name visible across the system and in selections.
Activity - A value describing the current readiness in terms of offering calls to agents. You manually switch between statuses in this editor.
Prepared - A draft-like status, the campaign has it immediately after creation. Calls are not offered to agents.
Running - The campaign is active and calls can be offered to agents.
Paused - The campaign is inactive, calls are not offered.
Completed - If the campaign in the “Running” state has exhausted all possible calls, it switches to “Completed”. Calls are not automatically offered.
Description - Detailed description of the campaign.
Directing of calls - Masking of outbound calls (i.e., under which number they should be presented on the customer’s device).
Default queue - The created campaign outbound call will be assigned to this queue.
Default language - The created campaign outbound call will be assigned this language. This means that to be offered to an agent, the agent must have proficiency in this language.
Skill, Proficiency, Priority - The created campaign outbound call will be assigned these values. More about skills and knowledge see Agents.
Note
You can also specify values for specific calls individually when importing the recipient list. Values from the import take precedence.
Max trials - If the first call fails, the call can be automatically rescheduled for another attempt. This value determines the maximum number of attempts.
Time zone - By setting the correct time zone for the called contacts, you ensure that the call will not be scheduled at a time when the contact is likely unavailable.
Rank batch size [%] - Prevention against overloading the distribution mechanism. Performance optimization for high-volume campaigns. The value indicates the percentage of the total number of logged-in agents to whom the call will be offered. For example:
100- The number of calls in the batch is the same as the number of logged-in agents in the system.Not filled (
NULL) - The number of calls in the batch is unlimited.
Manual distribution (count) - The number of calls from the import that will be created but not automatically offered to agents. These calls must be initiated manually. For example: If there are
20calls in the batch, but the parameter value is1000, all calls must be initiated manually.Call preview [s] - The agent can accept an automatically distributed call and view a preview - all call data (previous communications, open tickets, etc.) before actually dialing the customer. The set time determines how long the preview will be displayed. If no time is set, the preview is not active, and the call is dialed immediately.
Busy offset [s], No answer offset [s], Failed offset [s], To continue offset [s], Talk error offset [s], Lost offset [s] - A call that ended unsuccessfully can be rescheduled for another attempt. The system can evaluate the cause of the failure and adjust the scheduling accordingly. Here you set the time interval for each scheduled call based on the cause of the failure.
Warning
The value of Max trials must be greater than 1, otherwise rescheduling will not occur.
Predictor - Selection of the dialing algorithm for predictive campaigns. Predictors can be created via ReactAdmin.
Ignore agent counts for predictive dialing - Effective for predictive campaigns where call handling is done by a voice bot and not agents. The call is handled only by IVR and currently available agents can be ignored.
Answer rate estimate [‰] - Input parameter for the “predictor”. Estimate of how many dialed calls will be answered by customers. The value is in per mille, i.e., 1000 is 100%.
ID - GUID, not editable.
Answer margin [‰] - During a predictive campaign, you can positively or negatively influence the estimated answer rate for the next dialing cycle.
Actual average dialing time [s] - The average time between the start of dialing on the Frontstage side and the customer’s pickup/rejection. Calculated from automatically offered campaign calls. You can reset the statistics using the adjacent button
 .
.Actual answer rate [‰] - The ratio between answered and unanswered calls. Calculated from automatically offered campaign calls. You can reset the statistics using the adjacent button
 .
.Actual average call duration [s] - The average time between the customer’s acceptance of the call and the end of the call (by either party). Calculated from automatically offered campaign calls. You can reset the statistics using the adjacent button
 .
.
Warning
If you change any parameters during an ongoing campaign, the change will affect newly offered calls. Those that have already been offered to agents will remain in their original state.
Voice Campaign Imports tab
This tab is used to upload recipients for calling. This is done in bulk from a file. An outbound call will be generated for each recipient. These calls will be offered to agents to make once the campaign is launched. It is possible for one campaign to have multiple active call lists at the same time (multiple different recipient lists with active calling).
The open tab represents the history of recipient imports and the calling status of the given list.
Importing a file
To create an import, press Create in the header. A window will appear where you enter the import parameters.
Outbound list - Pre-populated with the campaign you are running the import from. Invariant.
Delimiter - Character that will be taken as a column separator in the context, for csv the semicolon is typical.
Encoding - Encoding type (character set).
Note
You can set available encodings for your installation. For more info see Encoding localization.
Start rank - The campaign processes calls centrally according to rank. Newly imported calls are placed at the beginning of the queue. By setting this value, you influence the position of the entire import within the existing queue. The rank can also be defined individually for specific calls in the file.
Tip
How to determine the queue range?
Open the detail of the last imported file on this tab.
The item Max rank indicates the number of calls in the entire campaign at the first place (the number is in the form
entire campaign count/import count)
Scenario - The selected scenario will be displayed to the agent during the call, and they can record relevant information in it. See more at Forms.
Predistributed - The import file contains
AgentIDas one of the parameters. If this parameter is filled in and the Predistributed switch is active, the call will be offered directly to this agent. Otherwise, it will be offered to an agent according to the distribution rules.IVR script - Calls can be handled by agents or just IVR. If you select a script here, the calls will be handled purely by the voice bot.
Import as draft
Scheduling mode - Select the appropriate time range for the calls to take place. They can be repeated periodically.
File path - Path to the local import file.
Download CSV template - You can download a template where the available columns are visible and the necessity to fill them is described. Use this button when you first import your campaign, then you can import your completed file.
Important
The principles of proper file creation are already described in another article.
To start importing contacts, press Create, displayed in the open window.
Import detail
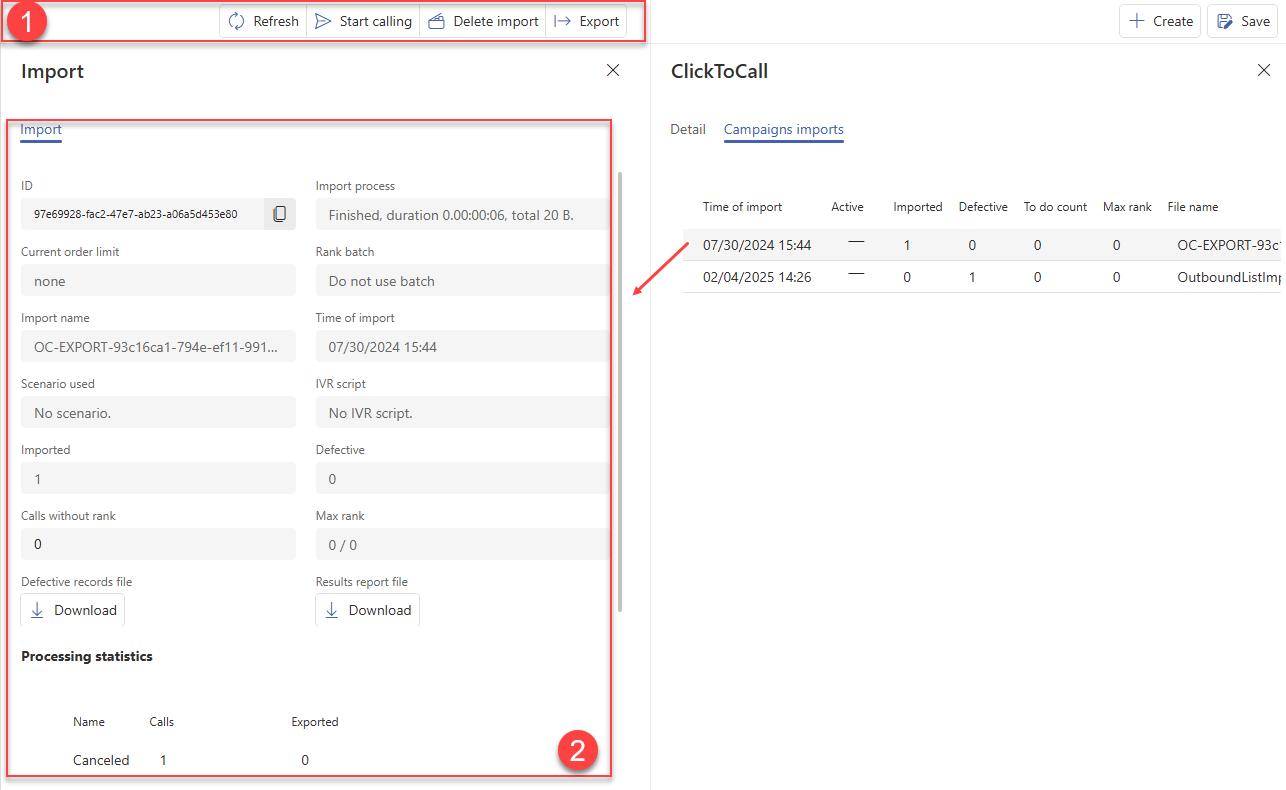
Open the detail by clicking on one of the records on the Campaigns Imports tab. It contains controls for working with the import [1] and its metadata [2].

Campaign control:
Refresh - Updates the data displayed in section [2]. Useful during import.
Start calling - Starts generating calls for the imported batch of recipients.
Important
To actually start generating calls, the overall campaign must be in the “Running” state, see the Status parameter on the Detail tab.
Delete import - Removes the entire import from history. Calls that have already been generated will remain in the system.
Export - Launches a wizard to configure the export of campaign data to a file. The data includes information imported into the campaign and collected during the calling.
Scenario items pre-filled by import
If you link a campaign with a scenario and want to pre-fill some items via import, you must define the columns in the import file to match the scenario elements. Predefined responses are typically used for customer confirmation and will appear as ScenarioResultValue results after import.
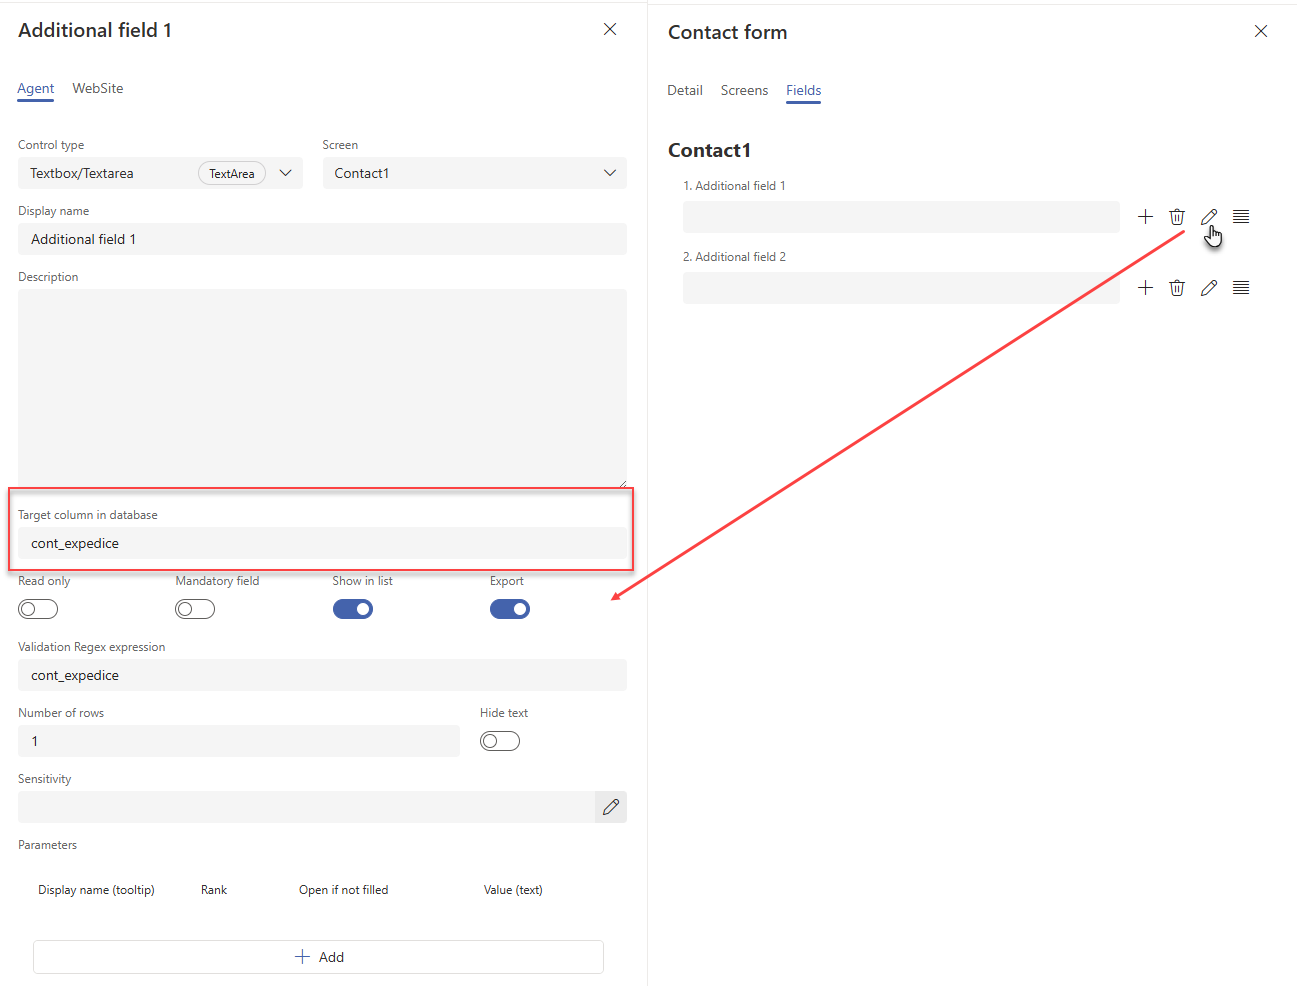
The column name in the CSV file must match the Target column in database item visible in the element details.

The value of the column in the CSV file will become the predefined response for the element.
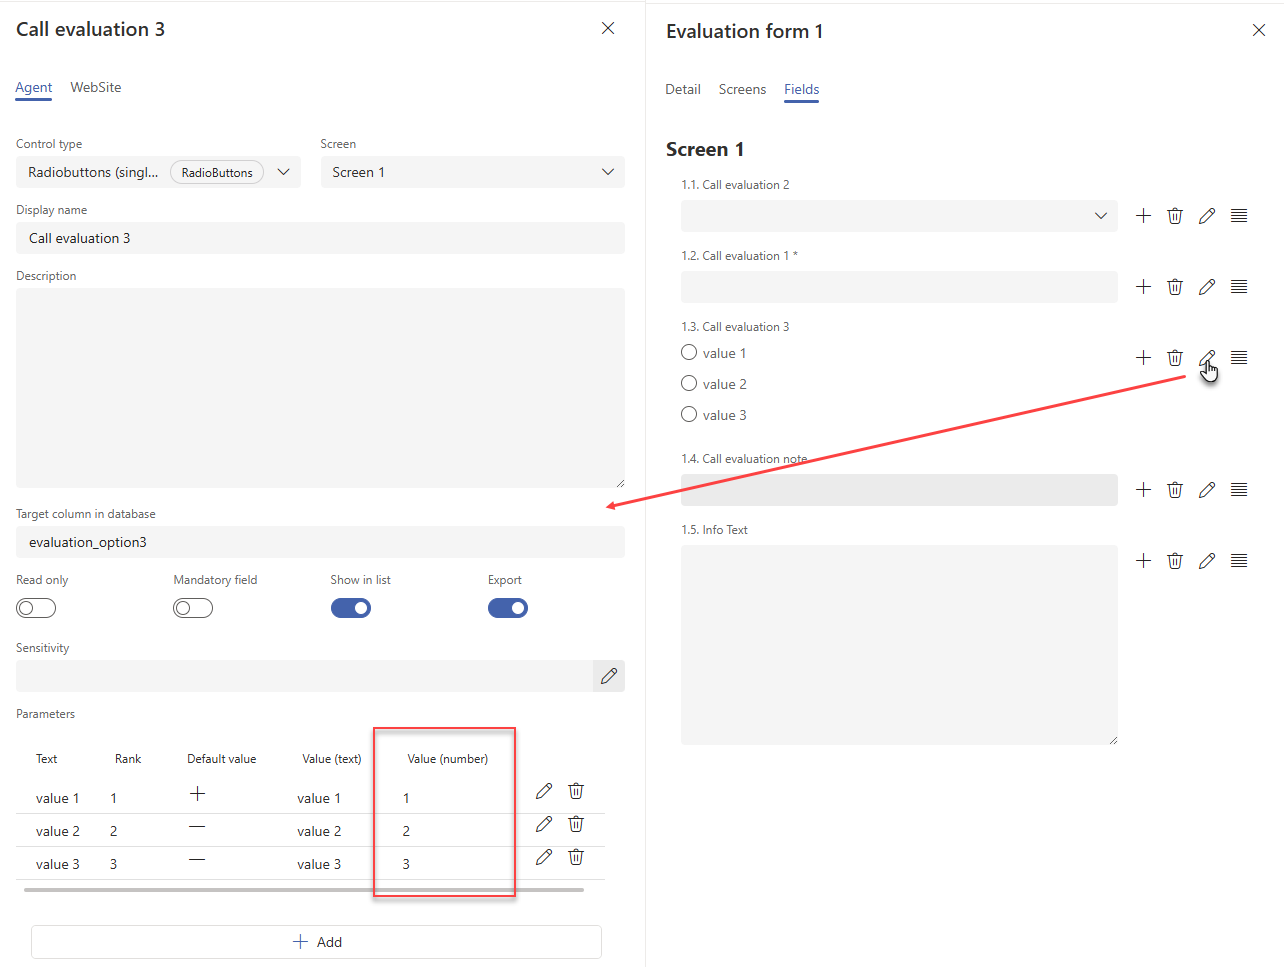
For elements where a selection is made from a list, the value in the CSV must match the Value (number) as defined in the scenario element.

After a successful import, the default responses become values in ScenarioResultvalue.