Shift editor
The Shift Editor is the most important user element that you will use in many places across the WFM module.
Note
Although we use the term ‘shift editor’, you will often encounter its read-only version called ‘shift viewer’ (e.g. agents can only view but not edit their plans). Another slightly specialized version is week template editor. All variants of this component are used in a similar manner.
Basic overview
The shift editor visually represents the plan. It looks like a table that shows the team member names and their activities.

The staff list [7] shows details in columns, such as the role, team, workplace, etc. (the columns correspond to fields of the quick filter [1]). Click on the column header to set sorting by the given column (see Sorting).
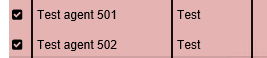
Shift editor shows checkbox in front of agent name and number of selected agents. To restrict the list to only selected agents, press  close to the rest of action buttons [6].
The other buttons in the menu button [6] zone have the following meanings:
 Allows you to delete the selected slot.
 Used to zoom in on one day.
 Sorts by the first slot start (see Sorting).
Activity slots (‘worms’) [8] show the team members’ activities, i.e. when they are absent, available, and what exactly they do when available. Below we explain how to read the slots.
The upper part offers a quick filter [1] by which you can limit the list of staff to those who meet certain parameters. The filter is applied instantly. When searching, upper/lower case does not matter, and the search string is looked for at the beginning as well as in the middle of words. Thus, it is enough to write just the initial letters, for example.
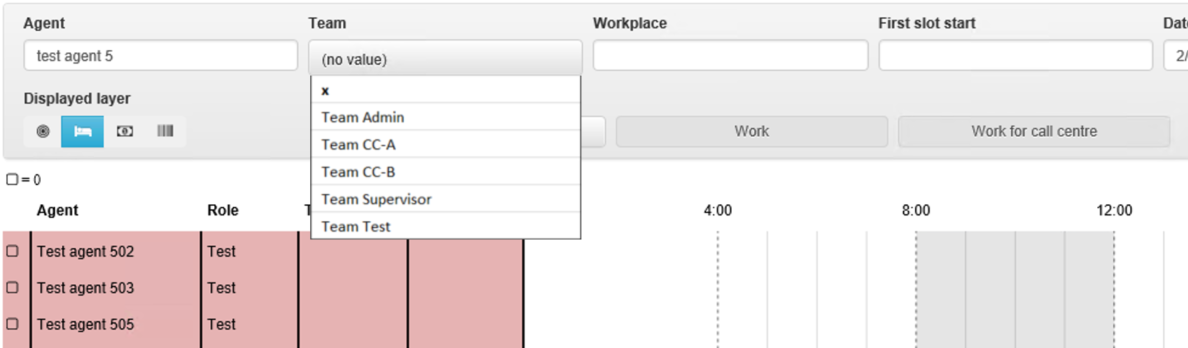
Another buttons navigates you to specified date and time [2].
If necessary, you can use the four move buttons [3] to move the displayed plan one entire screen backward, half a screen backward, half a screen forward and one entire screen forward. Moving on time line is also possible by dragging left mouse button.
The editor and the browser also contain layer switch buttons [4] that can be used to select all layers or just a particular one as described further in Editing/Displaying layers.
How to read slots
Caution
Layers are differentiated by various heights. The tallest is absence layer, middle height has availability, and the lowest is workload layer. The following illustrations emphasis height differences for better understanding. The height difference is not so visible on actual FrontStage screens.
Moreover, the following illustrations always use transparent absence layer. In actual FrontStage, a layer is transparent only if it is not chosen.
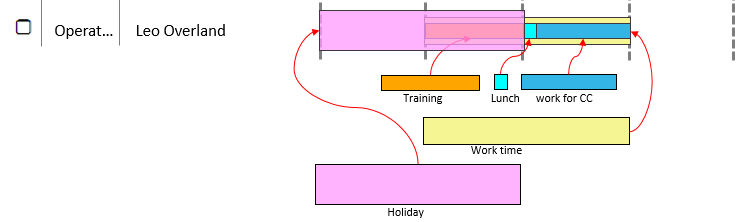
The main component of the shift editor/viewer is a section that displays slots or ‘worms’.

Team member’s name is followed by one of more colored rectangles (slots). The colors and meanings can be configured, and that is why they can be different in your FrontStage.

Since each of the slot types are layered in one line, it requires a bit of practice to read the slots. Slots are stacked-up in three layers, which corresponds to the activity types:
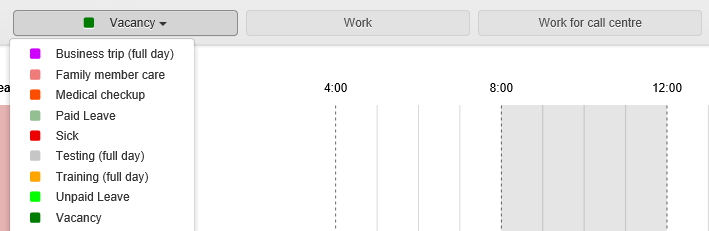
(holiday and sickness) (“absence”) – e.g. vacation, doctor appointment, unpaid leave – this layer is always displayed as the bottom. Other layers can overlap it.
work and on-call shifts (“availability”) – e.g. usual work hours, overtime or on-call shift – this layer is shown as the middle layer above the absence layer. For some availability types, you need to specify the workload.
workload - e.g. work at the CC, legally required break, mandatory training – this is the top layer displayed over all the other layers, yet only within the availability slots.

For example, the first agent in the first figure has their time planned as follows:
availability of the usual work hours type from 6:00 am until 6:00 pm
during this time, the workload of work at the CC type is scheduled from 6:00 am until noon
the lunch break workload will follow from noon until 1:00 pm
the work at the CC workload resumes from 1:00 pm until 6:00 pm

The other team member will be absent for the entire day due to vacation:

The last team member’s plan looks the most complex since the person has the following activities planned:
Absent for half a day due to vacation (from 0:00 until noon) 1 – absences cover any other work availability and workload slots.
in other words, out of the total availability of the usual work hours from 6:00 am until 6:00 pm, only one half will actually remain: from noon until 6:00 pm
the absence ‘hides’ the morning workload of the training type, scheduled for 6:00 am until noon
the team member will come at noon and spend one hour from noon until 1:00 pm having their lunch break
for the rest of the day, the scheduled workload is work at the CC from 1:00 pm until 6:00 pm
Note
- 1
It is possible to set a special interpretation of vacation length. For example, it is recorded as half a day of vacation only between e.g. 0.25 to 4.25 hours, with any longer absence being considered a full day of absence. See Vacation calculation.
Day slots tab
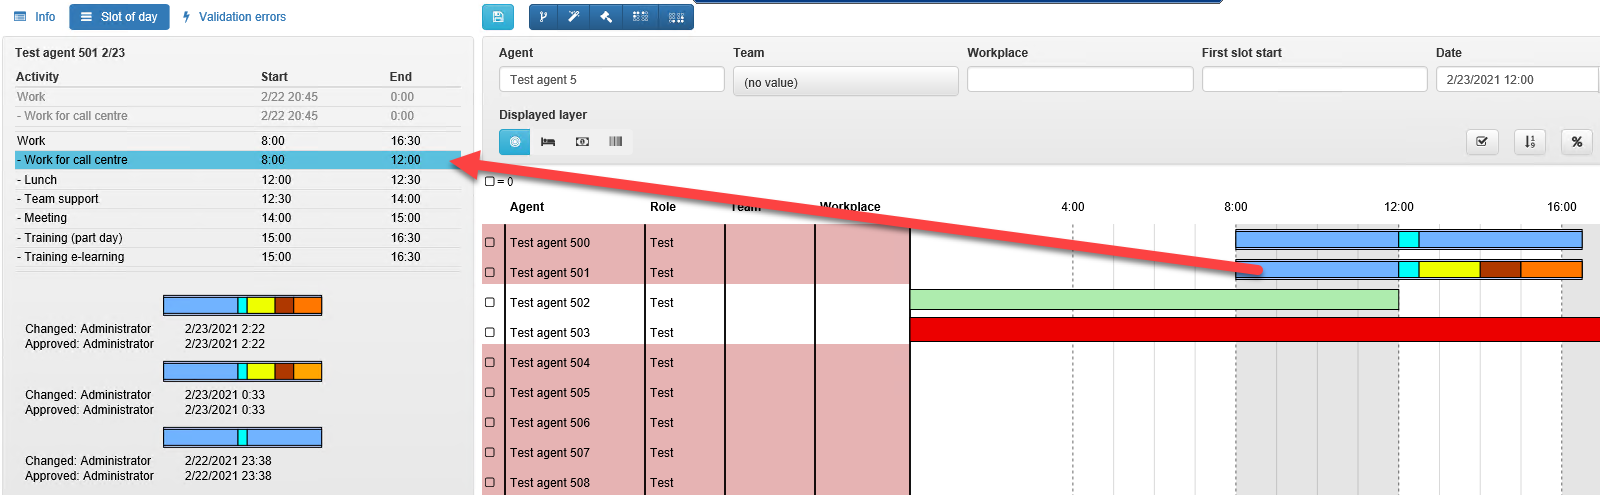
If you are not sure which information the slots display, you can use the Day Slots card. When you select one of the staffs, the card will show you a breakdown of all the team member’s activities for the given day.
By clicking on a specific slot, the card shows all all activities, changes and approvals. Day Slots also show change history (who changed it and how, who approved it).
Zooming in/out
You can zoom in or out of the slots in the shift editor as you need. If you intend to add a slot spanning over the entire week (e.g. a week of vacation), zoom out to display, for instance, an entire month. If you want to better see when the slot begins, you can zoom in to see the hours. Both zooming operations can be controlled by pressing Ctrl and rolling the mouse wheel up (zoom in) or down (zoom out) over the slots.

Button in the header allows to zoom to 1 day (24 hours).
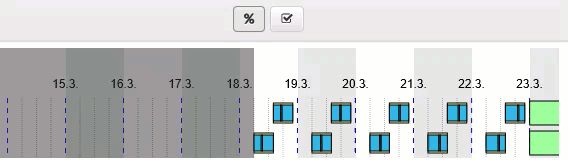
Every plan has a certain starts and end time, i.e. plan period. You cannot place any slots outside the plan validity period. If you zoom out too much or move too far right/left, you will come to the beginning or end of the period. The time outside these borders is shown as a grey zone on the time axis in the Shift Editor. For example, for a plan starting on 25 November, the time before the start date is a grey zone:

Upcoming agent’s 7 days
A useful shortcut is to display an agent’s plan for the upcoming seven days.
To allow this functionality, tick the chechnox in settings.
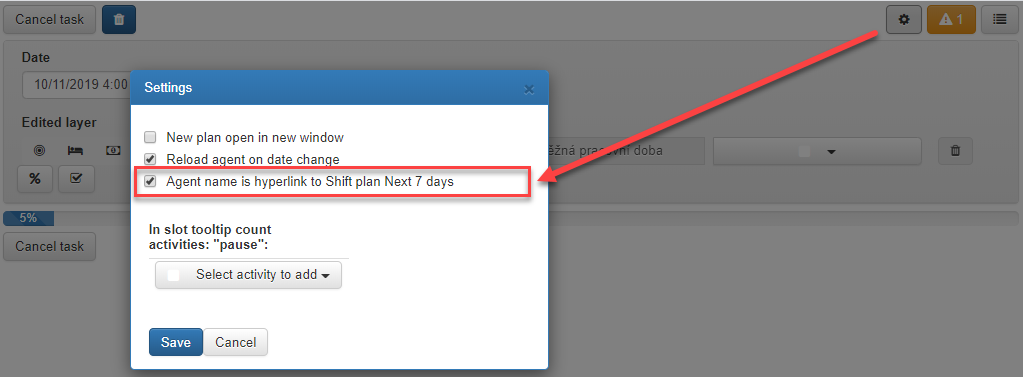
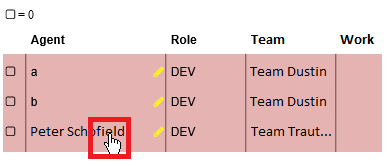
Then you can click on an agent’s name
to switch you to his plan for upcoming seven days. One day per row.
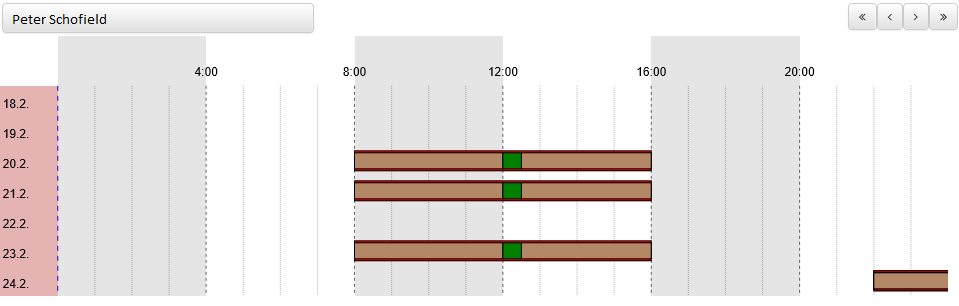
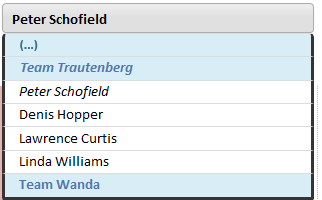
Arrows in editor header are for moving by period backward and forward. Combobox can be used for displaying different agent.
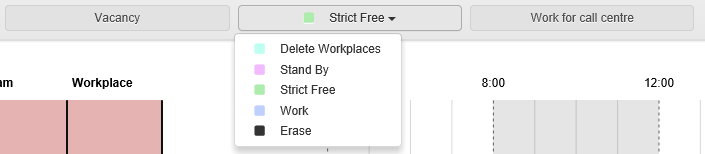
Switching between layer editing/viewing
The shift editor contains a very important switch that lets you determine the layer to be edited or viewed (in the case of the shift viewer). This layer switch offers four buttons for four editing/viewing modes:
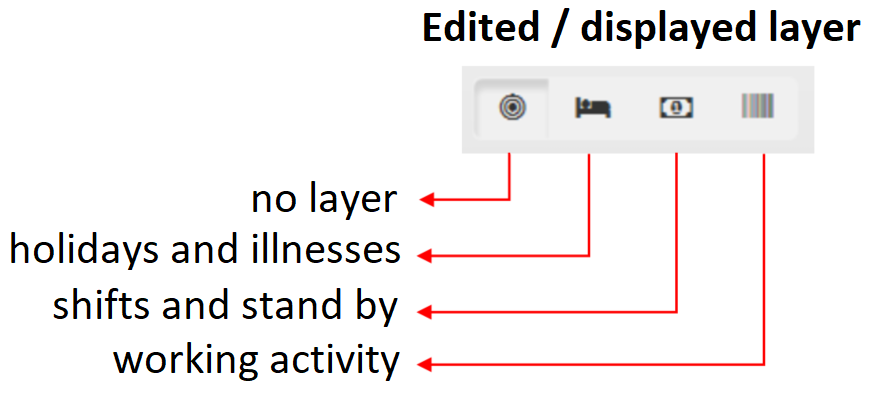
The switch is important in particular for the shift editor since the mode determines the behavior of the entire editor:
If you select no layer in the editor, it means that no slot can be inserted.
if a layer is selected (e.g. absence), you can insert just slots of the given type (e.g. sickness, unpaid leave, doctor appointment, …)
Important
When in the shift viewer version, the No layer mode means no limit to displaying layers, so it actually means to display all layers.
Currently chosen layer is rendered opaque — other layers as transparent.
Sorting
The shift editor allows sorting.
By columns in the list of agents as Agent, Role, etc. if you click on them.
By the start of the first shift using the
button in the header.
Both options work similarly, with colors used to differentiate the sorting type:
The first click sorts the column in an ascending order and the color changes to blue.
The second click sorts the column in a descending order and the color changes to red.
To cancel sorting by the start of the first shift, click on the header of any column.
To cancel sorting by any of the columns, click on the button for sorting by the start of the first shift.

Editing slots
The most important feature of the shift editor is of course the possibility to edit slots. Below we describe how you can add, shorten or extend, move and delete slots in various layers.
Important
Please bear in mind that you can only edit a slot in a layer if the given layer is selected in the layer switch.
Adding slots
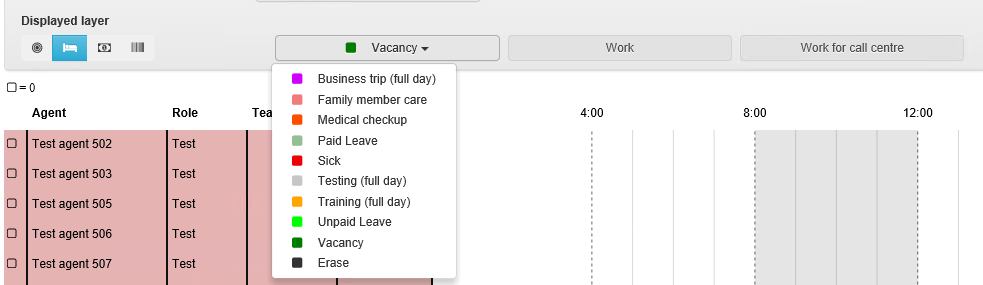
If you need to add a slot to the absence layer, select this mode in the layer switch.
When you select a layer, three drop-down lists (combo boxes) will appear for three layers.
The layer switch enables or disables each of the dropdown lists.
When editing the absence layer, only the dropdown list with absence types is available.
Some availability types needs to be “filled-up” with a workload. For example, the usual work hours availability type requires that the workload is specified.
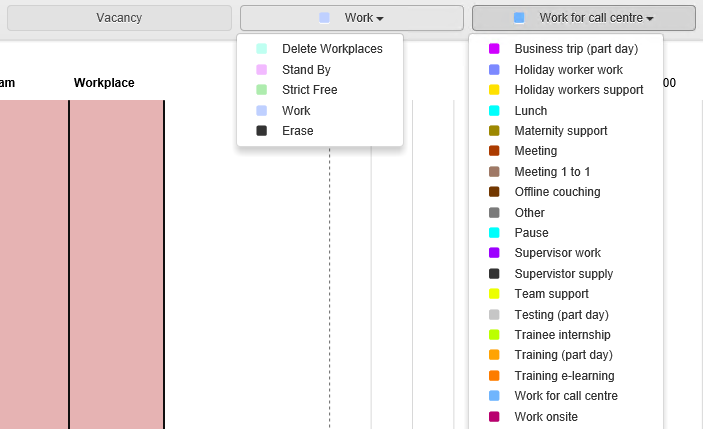
Other availability types do not require a specific workload to be specified; therefore, the third dropdown list is disabled in that case.
Check one or more team members to whom you want to add a slot.
In the editor close the time axis, begin to drag the mouse cursor from the start time and release it at the end time of the slot(s) to be created.
Congratulations! The selected slot(s) will appear once you have released the mouse cursor at the end time.

Shortening and extending slots
Another common editing is shortening or extending slots. It is easy to shorten or extend slots in the shift editor.
For example, let us say that we need to shorten a training, which is scheduled from 8:00 am to 9:00 am. We need to shorten it to 8:30 am only.
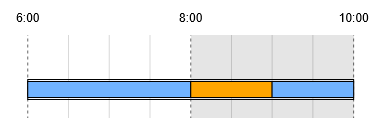
We are going to edit a workload slot, and so we need to select this mode in the layer switch.

The training being edited means that we specify the workload under the usual work hours availability type, which always needs to be fully covered with specific workload. In such a case, you need to select a workload that will fill out the space created after you shorten the training – e.g. lunch break.

Click on a slot. Then use the mouse to select either the left or the right slot edge and drag it to shorten or extend the slot.
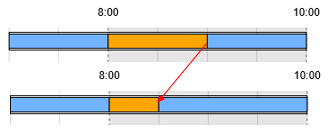
The freed space after shortening the training will be filled out by the pre-selected new workload of the lunch break type.

Moving slots
To move a layer by left mouse dragging, the layer has to be selected.
Deleting slots
A slot can be deleted by shortening it to the extent that it disappears.
Another option is the button in the editor header, which deletes the active slot.
Caution
The button is available only if you select layers in layer switch you want to delete.
Caution
The workload layer adds information on the availability layer so you erase it separately. See Explanation of layers and activities.