Administration
Section, which describes settings options for TeamsClient.
TeamsClient’s logo change
Company’s logo, displayed in the application in the upper left corner, can be changed according to your needs.
Prepared the intended logo in the
SVGformat and name itlogo-frontstage.svg(the name must be exactly as listed)Prepare the utility “General.Model.Db” (installation possible for example via the
prepare.ps1script.)It is advised to have the logo and the utility in the same folder.
Run “PowerShell” and open the given folder (
cdcommand)In “PowerShell”, execute this command:
General.Model.Db\General.Model.Db.exe setcontent logo-frontstage.svg <ContentId>The picture was stored into the database under the provided ContentId.
New logo will appear after refreshing the website.
Note
The logo picture is directly accessible through URL protocol://server/aplication/api/content/logo/logo-frontstage.svg
“Hamburger menu” buttons function adjustments
By pressing any button from this menu, an URL is called on a background, which consists from certain parametres by default. These parametres can be changed, added or deleted on demand. This way, you can change the default behaviour of the menu button.
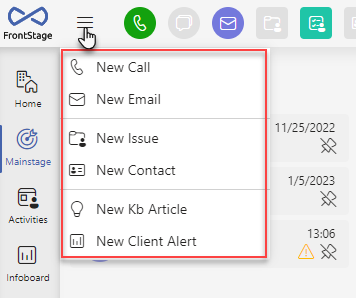
The changes can be made in administration, section, where you can see the default menu items (buttons’ background), grouped in a TeamsMenu group. Their display order within the hamburger menu is governed by the Order value.
For example: Item $Teams_CreateNew_Email with URL message&msgtype=Email&CampaignId={0}
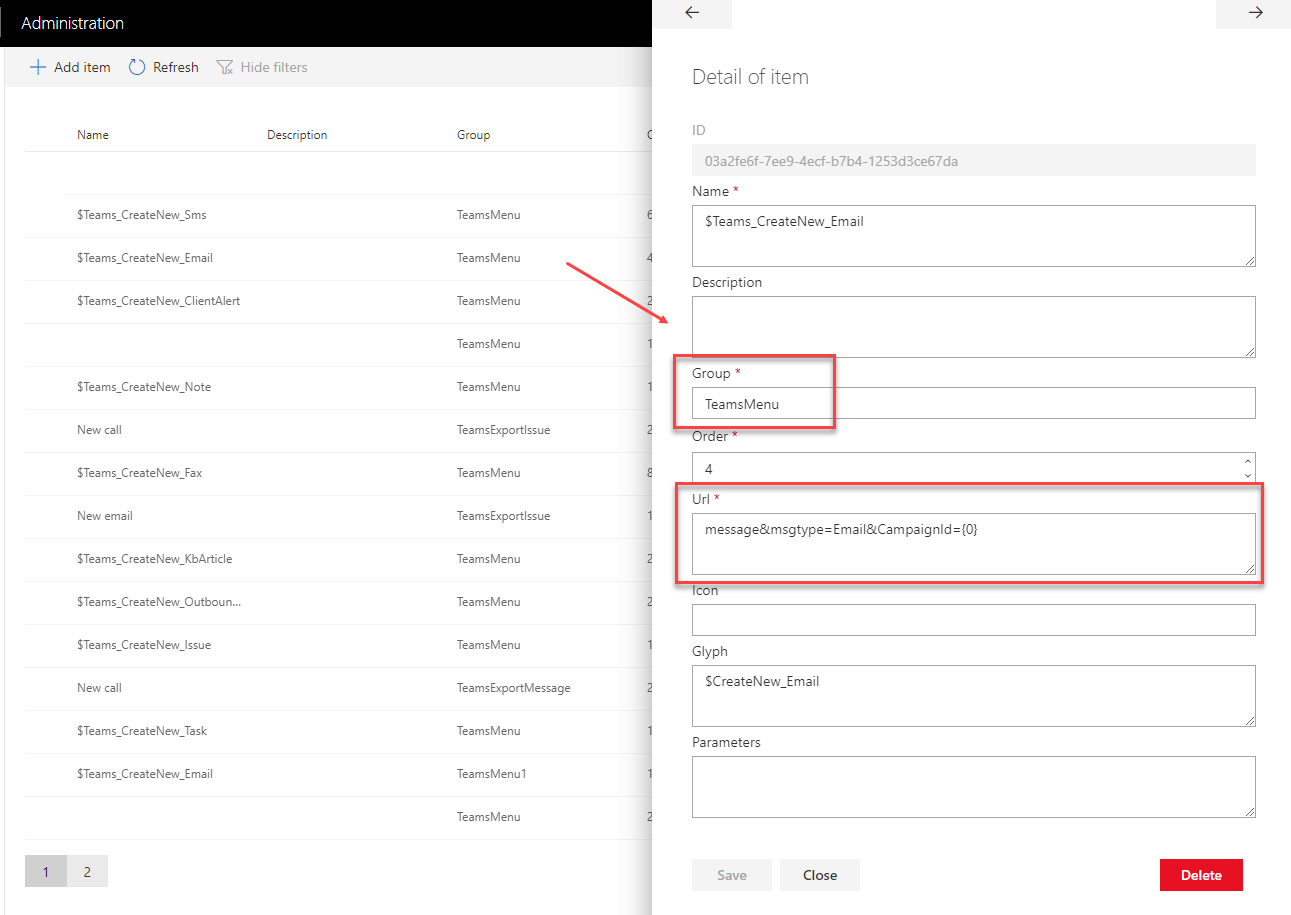
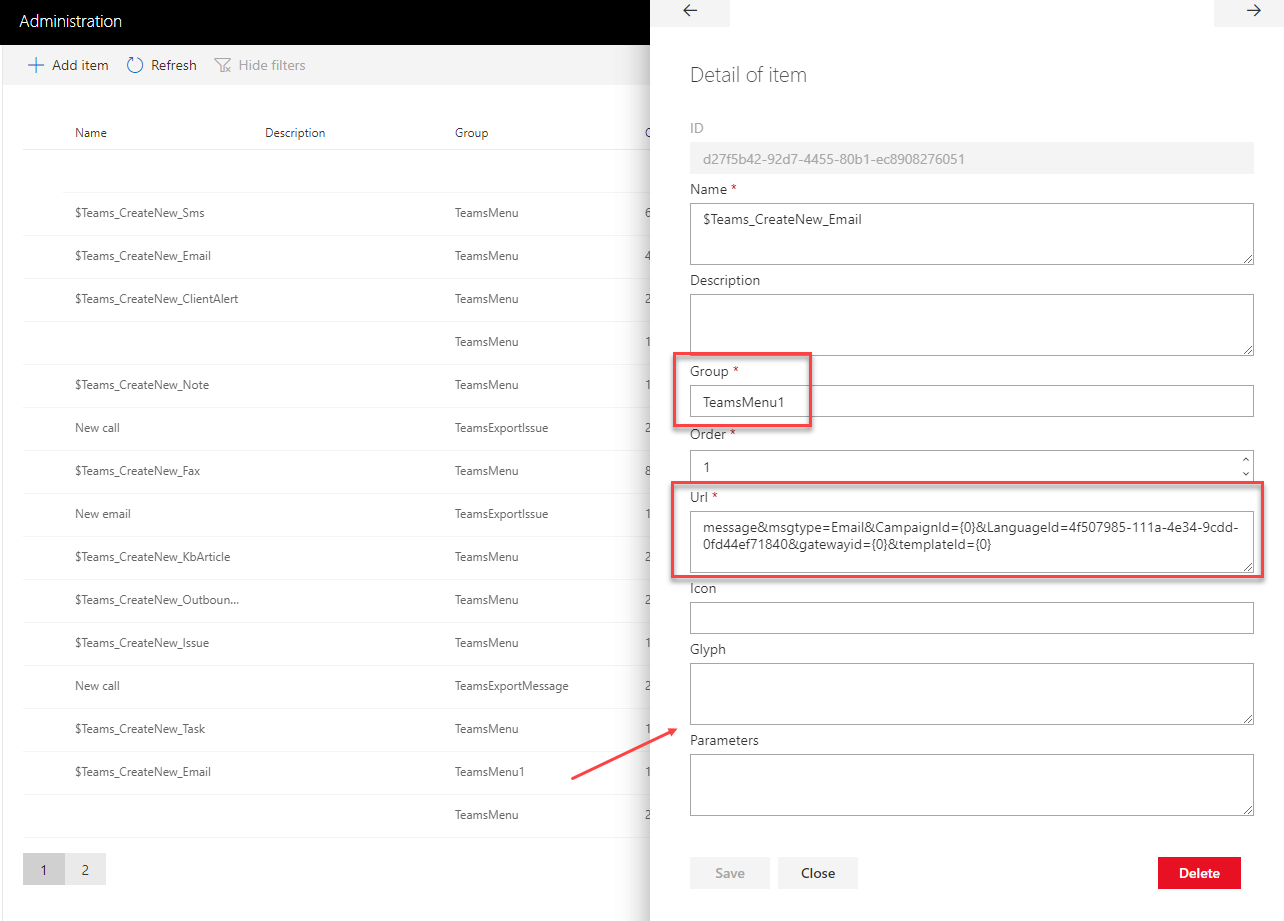
If you would like to make the adjustment, first create a new menu item group, which will be displayed, leave the default one unaltered for an eventual usage.
Which menu group should be displayed is governed by
TeamsMenuNavigationGroupparameter. Set this param to the desired value, like “TeamsMenu1” .Next, go to the section, create a new menu item, included in a newly created group, for which you can adjust the URL .
The URL can contain not only the QueryString parameters for the object creation purpose, but also an additional information, what type of drop-down menu should be displayed and if there should be something prefilled in it.
Full URL: message&msgtype=Email&CampaignId={0}&LanguageId=4f507985-111a-4e34-9cdd-0fd44ef71840&gatewayid={0}&templateId={0}&ToField=email@email.com
This URL calls a set of actions: drop-down for a campaign, sets language (defined by GUID), sets the gateway and email template.
Possible drop-down values:
outboundlistid
campaignid
projectid
model
templateid
languageid
gatewayid
Grid full-text search
Important
Available only for MSSQL installations. PostgreSQL does not support this feature.
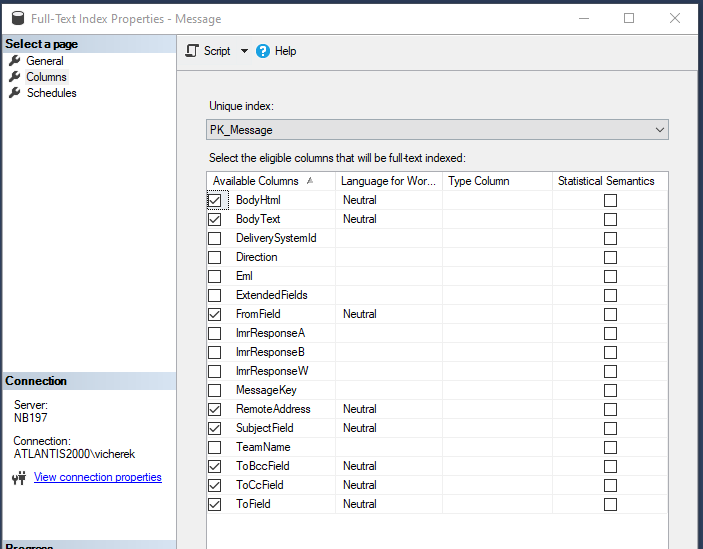
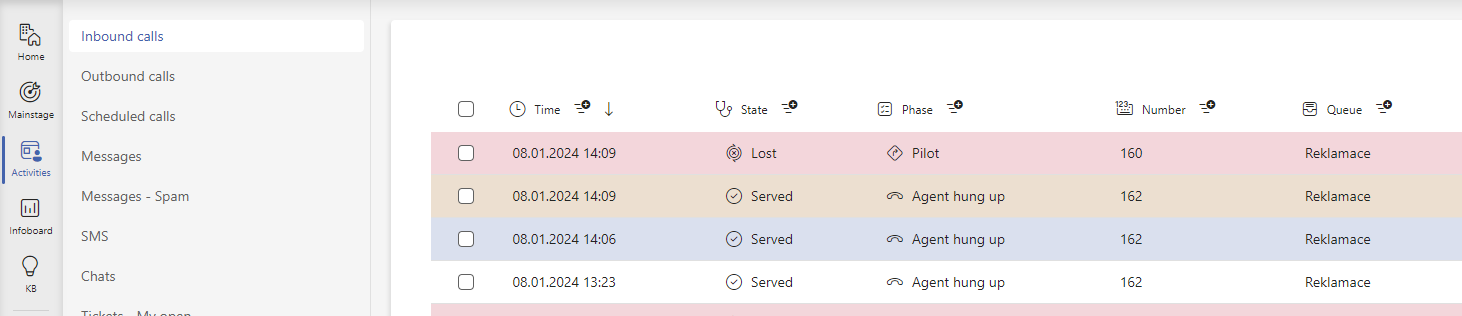
A full-text search field can appear above the DQG in an Activities tab.
The search field appears in a case when the data query contains at least one data query column, which has the FullText, FreeText, HyperFullText, or HyperFreeText model and at the same time it contains this particular string within the query: AND '##GeneralFullText##'='##GeneralFullText##' . Columns with mentioned models are then used for the search.
Important
A data source (database table) has to have defined a full-text index (set out of FS)
Columns of the mentioned model type can have full-text filtration enabled, it depends on the Disable filter settings, located in DQC administration.
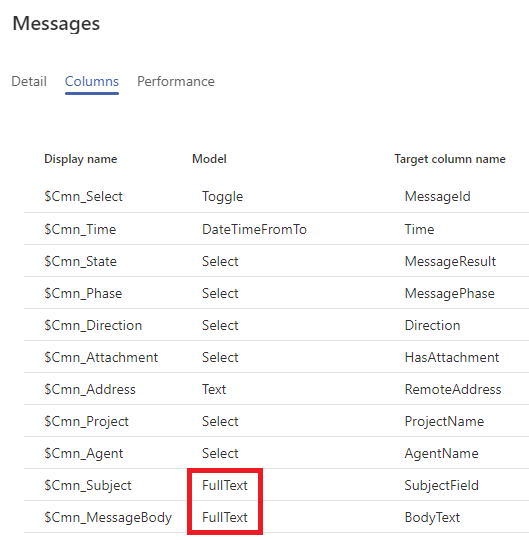
Example:
Let’s say, that the following query has two FullText columns in FS. Column Cmn_Subject is mapped to database column SubjectField, Cmn_MessageBody to BodyText.
The database has the index turned on.

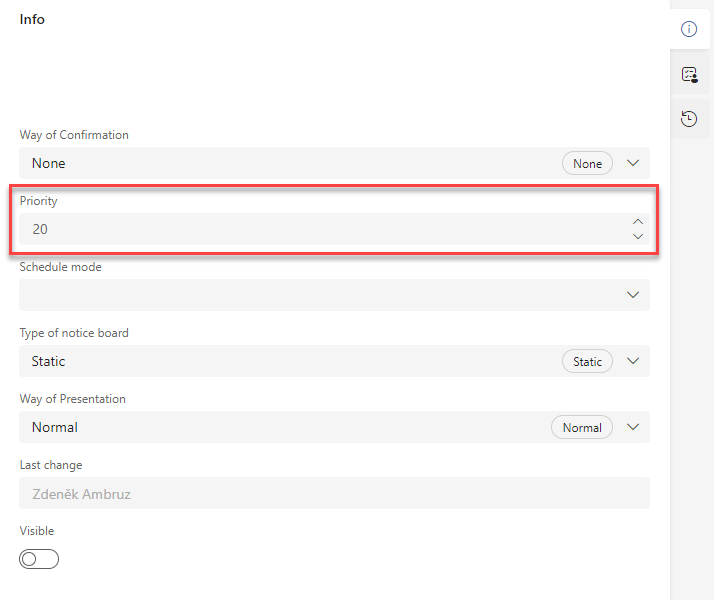
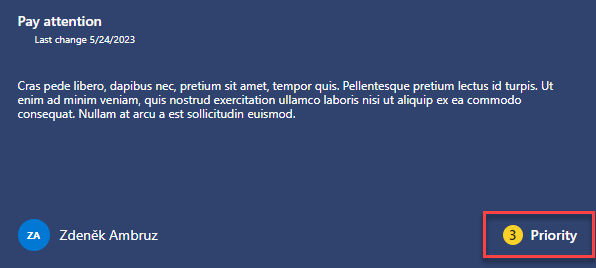
Infoboard article priority
Infoboard articles can have priority. The value inserted in the form is interpreted in a different way inside the informational buble, within the infoboard preview.
let’s say, the entered article value is 20
a formula
Math.floor(Priority / 10) + 1will be used to interpret the value within the preview (round down the equation result from brackets and add one)according to the described above, if the default value is 20, the preview will contain 3
Additional form buttons
Additional buttons, which are not included in default configuration, can be added for particular app forms. Settings can be done only in the database. More info at internal wiki .
For example items 5 and 6:
Rows per page for grids on the Activities tab
The Activities tab can display grids to the agents, like Data table portlet. Set a number of rows for each of the grids.
Open
protokol://server/rc-instance/pages/Portal.html#activitiesURL by using your browserDisplayed page presents the same grids like the Activities tab, here they are present in portlets
Open portal editation
Trigger edit mode for a particullar portlet
Adjust Row per page in grid to desired value
Communication channels and menu items visibility
TeamsClient reacts to the channel usage settings, which is controlled using the ChannelUsage parameter by hiding all of the items related to the deactivated channels.
Influenced areas:
Activities and Reports (supervisor’s section) tabs content
Hamburger menu content
Activities tab bulk actions
You can restrict the access to the bulk actions the way that only a particular agent can use specific actions. You can set this in two major steps:
Note
Example explained using ReactAdmin, but it can also be applied with minor modifications via Visual editors or database
Creating needed Scope
Open the table and insert a new record
Name it appropriately so you know its purpose
In the Name indication item (column
ReferenceDatain the database) insert one of the constants (without quotes) that indicates a specific bulk action
Possible values for bulk actions
Inbound Calls
CallInAssignReturn- Assignment or return
Outbound Calls
CallOutAssignReturn- Assignment or returnCallOutBulk- Schedule callsSmsSend- SMS send
Messages
MessageAssignReturn- Assignment or returnMessageChangeMeta- Metadata changeMessageForward- ForwardMessageReply- ReplyMessageSend- Email sendNoSpam- Unmark spamSpamManual- Mark as spamSpamBlocked- Mark as spam and block userSmsSend- SMS send
Chat
ChatChangeMeta- Metadata change
Issue
IssueAssignReturn- Assignment or return
Agent
AgentStatusChange- Change statusAgentProjectGroupChange- Change queueAgentLangChange- Change languageAgentBusyConditionChange- Busy conditions settingAgentBarDataQueryChange- Buletinboard settingStatusBlockingChange- Status blocking change
Note
You can find out if your installation has other bulk actions available from the LiteralLookup database table by searching for records by the LiteralText LIKE 'Teams_Query_BulkOperation_%' column.
Creating a permission
Open the table and insert a new record
Select the role
BulkAction, the permission levelAllowWrite, the desired agent and scope as created above
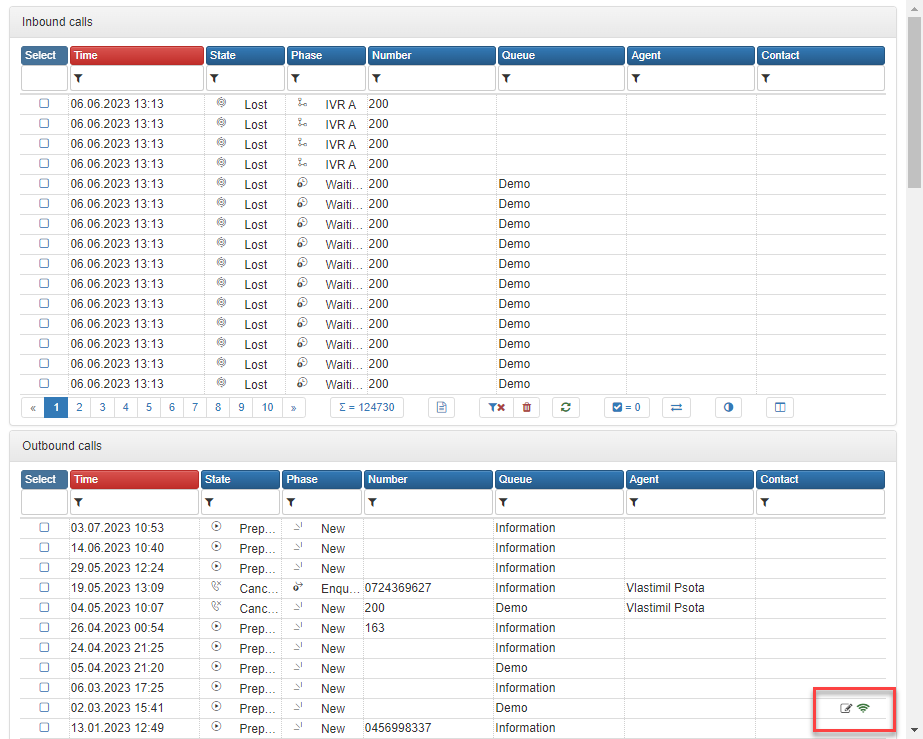
Grid rows CSS styling
The Activities and Reports tabs can display data query grids within the TeamsClient app. You can color the grid’s rows by adjusting the data query.
Open desired data query using the Data queries visual editor.
The Detail subtab contains the data query definition in the Query text item.
SELECT
 ic.InboundCallId, ic.PilotTime,ic.CallResult,ic.CallPhase,ic.CallerNumber,
 p.DisplayName as ProjectName, a.DisplayName as AgentName,c.ContactId,
 c.DisplayName as Contact
 FROM InboundCall ic with (nolock)
 LEFT JOIN Agent a with (nolock) on ic.AgentId = a.AgentId
 LEFT JOIN Project p with (nolock) on ic.ProjectId = p.ProjectId
 LEFT JOIN Contact c with (nolock) on ic.ContactId = c.ContactId
Create a new column here, name it for example
ColorColumn.The column has to be defined to return only a
0or1value. If the underlying data column contains different values than mentioned, define an appropriate logic, to preserve the mentioned output.Let’s use
ic.CallResultas an underlaying column, which commonly contains values1or2(call result literals)Update the data query of
(ic.CallResult % 2) as ColorColumn- This calculation uses the residue after the division by a whole number (modulus). This column definition returns only values0and1. Save the changes.SELECT ic.InboundCallId, ic.PilotTime,ic.CallResult,ic.CallPhase,ic.CallerNumber, p.DisplayName as ProjectName, a.DisplayName as AgentName,c.ContactId, c.DisplayName as Contact, (ic.CallResult % 2) as ColorColumn FROM InboundCall ic with (nolock) LEFT JOIN Agent a with (nolock) on ic.AgentId = a.AgentId LEFT JOIN Project p with (nolock) on ic.ProjectId = p.ProjectId LEFT JOIN Contact c with (nolock) on ic.ContactId = c.ContactId
Using the Columns subtab, create a new column linked to the
ColorColumndata query column. Pay attention to the parameters:Model - It has to be populated by the
Colorvalue.Target column name - The name has to match the column name used in the data query on the previous subtab.
CSS - Affects the applied row style. You can choose from
info,warninganderror.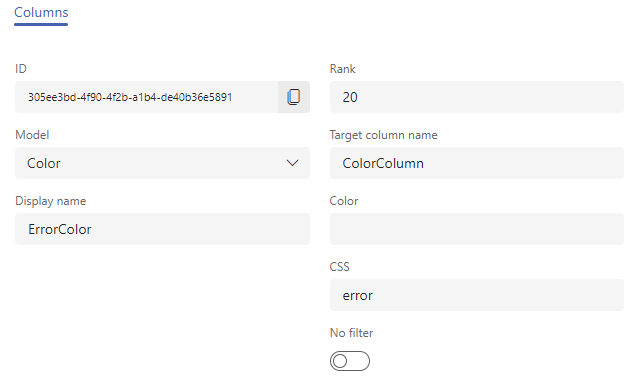
You can immediately check the adjustment using the Preview button in the visual editor. The row where the
ColorColumnreturned value1will be colored, and where0is returned, it will be without color. The color column itself is not visible in the grid.