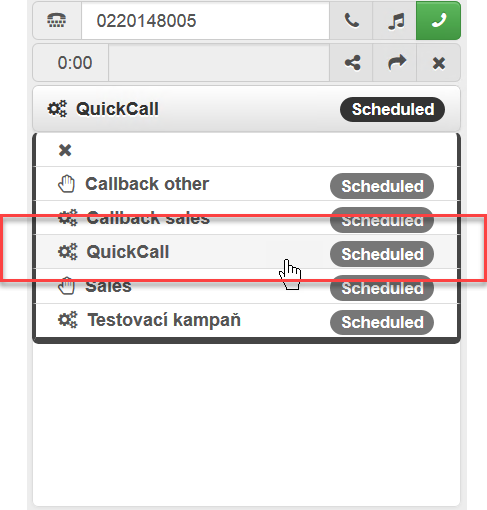
Outbound Calls
Setting up and managing outbound calls in FrontStage requires distinguishing between their types, understanding scheduling conditions and other aspects. In the second half of the article, you will find a few workflows how to define minimum settings required for outbound calls to function properly and how to troubleshoot common problems, among other things how to set up calls using URLs.
Overview
Outbound call types
When setting up outbound calls in FrontStage, it is important to have a good overview of each their type. Outbound calls are distinguished in FrontStage based on whether they are scheduled for a campaign – these are referred to as project calls – or they are not related to any campaign – these are called private calls.
Calls outside FrontStage
A call manually dialed on the telephone keypad is not and cannot be registered in FrontStage.
Private call
A call that is not related to any campaign because no campaign has been selected is referred to as a private call. There is no metadata for such a call. It can occur in several ways:
In ReactClient, if you enter a number manually in the call bar without selecting an outbound campaign.

In ReactClient, if you click on a phone number (JavaScript function
CallorConsult())The function can call another javascript function, and by doing so, the call will be stored in the
OutboundCalltable and have OutboundList defined. Example:SingleCheck('PrivateCall','{0}&OutboundListId=d7d8cb48-a2b0-4f0e-9698-2ea4b7b88551')
From anywhere by calling a URL in a format such as
http://server/ReactClient/api/bar/web?Cmd=PrivateCall&Par= 00420724123456&Seq=1&CallKey=12345678)
FrontStage can set private calls to be logged.
Managed call
Scheduled calls for a campaign are called project calls. Such calls are recorded including their metadata and can occur as follows:
In ReactClient if you enter the number manually (in the call bar) and select an outbound campaign.
In ReactClient by accepting the offered campaign call.
In ReactClient by creating a scheduled call (optionally a pre-distributed call).
In ReactClient by scheduling a callback.
In ReactClient by answering the offered call using predictive dialing.
In an IVR script by means of an automatically dialed call without an agent (e.g. a customer call evaluation using DTMF).
You can schedule a call to your campaign as follows:
In ReactClient by creating a scheduled call.
By calling a URL to an outbound call editor with pre-filled data (for example, to pre-fill the called number, the URL might look like
http://server//ReactClient/Pages/calleditor.html?Number = 00420724123456).By importing a CSV file in FrontStage administration.
Using integration means such as REST calling, direct modification of the database, etc.
By creating a callback after a queued call is terminated (LostShift).
By creating a callback by scheduling in the IVR, e.g. in the waiting queue.
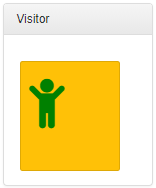
Outbound call type Visitor
This type of call is used to record the case when a customer comes to the counter without any prior communication and you want to record the situation (another type of call in the OutboundCall.CallType column ).
The issue record is called by clicking on the tab, which calls OutCallEditor.html?CallType=Visitor in the background.
Note
A sample database query for the tile can be found in Model.Sql/Admin-Standard/Test-Tiles.sql
Click on a tile to create a new record in the OutboundCall table, where:
CallType = Visitor
CallPhase = AgentTalk
CallResult = Prepared
WorkplaceID = workplace according to the logged-in agent
See also
More about states in the Call statuses and phases section
Clicking on a tile also opens a new browser window where the issue detail is displayed. The drop-down list for Call Result Details is governed by limit by call type.
Automatic distribution
The project call offer is scheduled by the ServiceSync synchronous service within cyclical distribution of calls. In the case of outbound calls, it takes into account the agent’s project skills, their status, and agent phone status. And when the unified queue is enabled, it also considers the current workload according to busy conditions.
Private calls can be made at any time.
The actual dialing is handled by the web-based ReactClient that communicates directly with ProServer and ServiceSync.
The outbound call is identified to the called party by a phone number specified in the PBX. This is usually a public telephone number. This outbound identification can also be changed for each project.
Tip
We recommend that you set outbound call identification to the pilot number or redirector used by FrontStage so that, when people call back, they can reach the contact center, not a specific agent.
See also
You can find the call progress and its phase in the Call statuses and phases article.
Manual dispatch
Cyclic distribution intentionally ignores outbound calls in Manual scheduling. This is used for calls that you do not want to have automatically distributed immediately but only when you decide to do so.
Manually scheduled calls are most often made by creating a campaign call for a project that has Manual sheduling (number) enabled. Calls to such a campaign can be accessed in the usual ways, such as creating a call in the IVR from a lost call, importing or scheduling calls to a campaign, etc.
You must enable automatic distribution manually by changing the call phase to Distribution (Enqueue) (the OutboundList table, the CallPhase column needs to be set to Enqueue). This can for example be arranged by
Clicking the icon in the data grid in the column with the ImageScript model that executes the SQL UPDATE command. For example, you can create a data grid with callbacks from the IVR for agents, and by clicking on the icon in the Dial column you can dial the call.

The SQL that is triggered by the click might look like this (besides changing the phase, this command also directly assigns the call to the current agent):
UPDATE OutboundCall
SET CallPhase='Enqueue', AgentId=@AgentId, Predistributed=1
WHERE @Id=OutboundCallId AND CallPhase='Manual'
Enabling the bulk action button labeled as Schedule outbound calls in the data grid portlet settings.
By directly modifying the call phase in the database or using an API.
Schedule post conditions
Specifies the conditions under which metadata, such as project or language, is changed for the outbound call or, if relevant, pre-distribution is cancelled, processing terminated etc.
Limitations include e.g. waiting time, longer than, current priority, project, etc.
Managing scheduling rules
You can manage scheduling rules in administration in the Outbound calls -> Schedule post conditions section. You need to set the following properties for each rule.
Call result details
During or immediately after the end of an outbound call, the agent can set a user-definable status, which we call Call Result Details. This is a selection of a value from a register for the purposes of statistics and further processing. Examples of values are “busy”, “wrong number”, “changed number”, “does not wish to be contacted” etc. Which Call Result Details will be offered depends on their individual settings.
CallResults adjustment can be done by Result codes visual editor.
Important
In the database table CallResultDetail there is a column Channels (NOT NULL, default = 1). It is a bitmask specifying the channels for which a particular Call Result Details is available. The mask value is only visible in the database, calculated based on the checkboxes in the administration.
Attention
If you are on a version of FrontStage built before 2021-04-23 and are upgrading, run the following script once:
UPDATE CallResultDetail SET Channels = 1537 WHERE Channels = 1 AND Deleted = 0
If you do not run the script, the already created Call Result Details will be displayed only for inbound calls.
A custom call result must correspond to one of generic statuses after outbound call execution (you select them in the General result drop-drop box).
For results like “call another time”, the agent can reschedule the call to another time. Or you can leave the rescheduling on the outbound campaign parameters.
The call result bar can be turned off, in which case the agent indicates nothing. In the relevant project, you can set whether to show the bar and how long to wait.
If the call ends before the call result is completed, the call waits for the result to be filled in for a pre-set time or without a limit.
Managing refined results
You can manage the detailed results in the administration in the Outbound calls –> Call result details section.
Post-call pause (PCP) status
The status generally referred to as PCP (post-call pause, or post-call processing) is used to record information gathered during a call, handle short tasks resulting from the call etc. No calls are distributed to the agent during the PCP.
Note
The status is usually named “Completing info”, “Post-call agenda”, “After-call”, “Wrap-up” and so on.
FrontStage can automatically switch agents to this status immediately after the call ends (whether inbound or outbound). Alternatively, agents can be automatically returned to the Ready status after a pre-defined time.
Setting the PCP status
You can set both settings on the project in the administration section as follows:
The Post call pause [s] text field can have the following values:
Empty – The function is disabled, the Completing status is not automatically enabled. Calls end in the NoResult status.
0 – Unlimited switchover; the status must be terminated by the agent themselves.
Positive number – The number of seconds after which the status will be ended and switched back to Ready unless the agent has manually selected another status in the meantime. If the period expires, the NoResult status is indicated.
Using Automatic PCP status drop-down menu you can set a specific status related to a project call and it will trigger after every call related to this project. This applies to both indound and outbound calls.
Creating the PCP status
You can create or edit the PCP status(es) in the administration section. The PCP status must have the status activity type set to PostCall.
Procedures
Registering private calls
Outbound calls dialed from the call bar but without an outbound campaign selected are considered as private (unrelated to any campaign). They are not recorded in FrontStage by default.
If you want them to appear in your outbound call log:
Set the
PrivateCallsOnBarActionconfiguration parameter totrue.Set the
PrivateCallsOnWebActionconfiguration parameter totrue.Clear the
DataStructures.Configcache.
Important
Calls made by dialing a number on a telephone keypad cannot be registered in FrontStage, so it will not be recorded, will not be visible in statistics, reports, etc.
Minimum settings required for project outbound calls
You must set up at least the following areas to enable the propery functionality of project outbound calls in FrontStage.
Create agent extensions on the PBX.
Create or set up the following in FrontStage administration:
agents
agent workplaces and seating
agent statuses (at least one ready state, optionally with allowed pre-distributed calls)
necessary project skills and language proficiencies
one or more projects
one or more outbound list in Running state
Common issues
If the call is not distributed to the agent, make sure that:
Outbound list is in Running state.
The call is really ready for distribution. In other words, it meets the following conditions:
It has the status of Scheduled and the phase of Enqueue, and
The call is in the current time window (columns
OutboundCall.TimeFromandOutboundCall.TimeTo), andThe call is set to the correct
OutboundCall.ScheduleTime.
Warning
If the call is in the Neglected status, FrontStage no longer attempts to distribute it.
This is most often because the
LostShiftWindowconfiguration parameter has expired (the interval in which outbound calls may be made for lost calls) or has already been unsuccessfully offered to the agent many times.The agent has project skills for outbound calls.
(With unified queue enabled) The capacity rule does not block the agent with another request.
The agent line is free.
Agent blocked [s]is disabled at the agent’s workplace.The agent is in the Ready state, which allows pre-distributed calls.
Opening the editor using a URL
By calling a properly assembled URL issued by ReactClient, you can open the outbound call editor with empty or pre-filled data. The call is established only when the agent has saved the editor.
The URL looks like <protocol>://server/ReactClient/Pages/OutCallEditor.html?<param1=value1>&<param2=value2>...
The following URL parameters are available:
Number– The number to be called; the number will be normalized. A required parameter.Predist– The call should be established with direct agent selection (pre-distributed).AgentId– If the call is to be created for an agent other than the currently logged on (authenticated) agent, the agent ID can be specified.CallKey– External call identification used when working with external applications.IssueId– The case ID to which the call should be created; in this case, the values of theProjectId,LanguageId,ContactIdparameters are used from the case (and any potential entries are ignored); theOutboundListIdparameter is used if specified, if not specified, the first outbound (OL) campaign with the corresponding project is used.IssueKey– Alternate case entry using an external key; ifIssueIdis entered directly, then it is preferred.
Another parameter group, if specified, overwrites the same property in the case specified by IssueId:
ProjectId– The ID of the project for which calls should be made; you must specify either this parameter or OutboundListId.OutboundListId– An ID of the outbound campaign for which the call is to be created; you must specify either this parameter or ProjectId.OutboundListId– An ID of the outbound campaign for which the call is to be created; you must specify either this parameter or ProjectId.LanguageId– An ID of the language in which the call should be created.ContactId– An ID of the contact with which the call should be associated.ContactKey– An alternative contact entry using an external key; if ContactId is entered directly, then it is preferred.PhoneNumberId– An ID of the phone number that is to be associated with the call.MessageId– An ID of the message from which the call is to be created; in this case, the values of IssueId and ContactId are used from the message.ChatId– An ID of the chat from which the call is to be created; in this case, the values of the IssueId and ContactId parameters are used from the chat.
The AllowWrite permission is required for a new call to be created for the agent logged in. Once created, the ReactClient editor page opens on the newly created call.
Creating e a call using URL
Another option is to use the URL provided by the REST API to create and dial a call. The user does not see the outbound call editor open, and the call is created directly in the database.
The URL has the following format: <protokol>://server/ReactClient/api/bar/web?Cmd=PrivateCall&OutboundList=<outbound campaign ID>&Par=<tel. number>[&<paramN=valueN>]....
The required parameters are OutboundList and Par:
OutboundListId– An ID of the outbound campaign to which the call should be assigned for reporting purposes. The OutboundListId parameter is mandatory for a project call, otherwise the call is dialed as private.Par– The destination phone number
Other possible parameters are optional:
AgentId– An ID of the agent for whom the call is created; if not specified, the call will be created for the authenticated agent.ProjectId– An ID of the project to which the call should be assigned for reporting purposes.LanguageId– An ID of the language to which the call should be assigned for reporting purposes.IssueId– An ID of the case to which the call should be assigned for reporting purposes.ContactId– An ID of the contact to which the call should be assigned for reporting purposes.CallKey– An external identifier (max. 48 characters), which is written into the OutboundCall table for the private call created.Seq– A sequential number that prevents the use of the cached page in the browser; for another type of client it need not be changed and can be constant. The system does not check the number in any way and returns it unchanged in the reply.