Outbound lists
Outbound campaigns are used to make multiple calls based on a pre-defined list of numbers. In this article, you will learn how to create campaigns, link to a scenario, populate data, manage and track progress.
See also
This article describes outbound lists, also referred to as call campaigns. You might be looking for campaigns or bulk messages related to messages as described elsewhere.
Outbound campaigns are used to create planned project calls in bulk, which will be distributed to agents like any other call (i.e. they must have adequate proficiency, etc.).
Important features of your campaigns include:
Campaigns represent a prescription for calls within a selected project.
You can use the campaign status to pause the campaign when, for example, agents have too much of other workload. When they have more available capacity, you can run it again.
You can set parameters such as the maximum number of repetitions, after what time a call should be repeated when not revoked, busy and so on.
If you associate a campaign with a scenario, a form from the scenario will be displayed to the agent during the call with questions that they should ask the caller. Thus, the agent will not forget to ask anything important, and you can then further process the collected results.
You usually import calls to a campaign from a CSV file, but you can also get them there using different methods, such as via an API call from an external system, from an IVR step, etc.
When importing a CSV file, you can pre-populate some responses to the scenario. The agent can thus confirm with the caller that the information such as the address is still valid and so on.
You can track how many calls remain to be processed and download the call results as a CSV file for further processing.
Quotas can automatically end your campaign. For example, during a survey you can set a quota indicating that once you have called at least 75% of men of working age, the campaign can end.
Visual outbound campaign editor
The creation, management of and imports into a campaign is done in a specialized visual editor. The editor is similar in appearance and control to other tools such as Caches or Message campaigns, which are usually inaccessible to common agents. Campaign calls are regular calls, so agents do not need any special permissions.
If ReactClient is deployed as /ReactClient, then its URL is protocol://server/ReactClient/Pages/OutboundListAdmin.html.
In newer editions of FrontStage, the VEO is a part of the installation; therefore, you do not need to do anything but configure it.
When updating an existing installation and/or configuring a new installation, do not forget to
Run the
Model.Sql/Admin-Standard/Standard-Admin.sqlscript, which creates new data queries in the database from which the VEO draws data for display and sets configuration parameters for these queries:OutboundListAdminQueryIdandOutboundListAdminImportsQueryId.Grant permissions
EditOutboundListthat restrict work with the VEC andImportOutboundCallthat restrict the execution of imports into campaigns.
Creating and managing a campaign
The steps are outlined below, but the most common procedure how to create and manage your outbound campaigns is as follows:
Is the purpose of the campaign a one-time (e.g. “insurance special for March”) or an ongoing matter (e.g. “verification of client contact details”)? For a one-time matter, it is better to create a new campaign. For ongoing matters, you should rather import additional calls into an existing campaign.
When creating a campaign, the most important thing is to choose a project that is handled by suitably qualified agents.
If you want agents to collect results, create/apply a scenario and link it to your campaign.
Prepare a CSV file with scheduled calls and import it.
Start your campaign, start executing imported calls, and track the progress.
Create
To create a new campaign using VEO:
When the VEO is open, click on Create an outbound list.
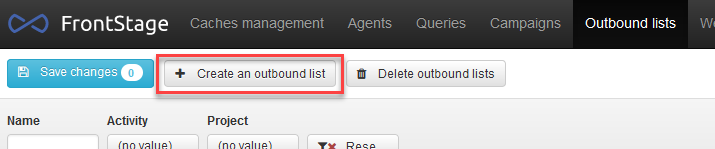
Enter a name of the campaign, a project under which calls will be created, and the maximum number of attempts before rescheduled calls fail.
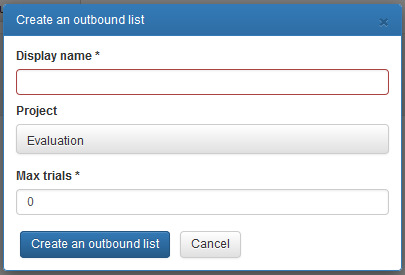
On the Detail vertical tab, enter the detailed campaign information.
Save changes by clicking on Save changes.
Import the recipients whom you want to call.
When you use a field for rescheduling when busy/not answering/failed/wrong person reached, etc., and a maximum number of attempts, FrontStage automatically reschedules the next call, with the failed attempt being removed from the queue and replaced with a new scheduled call instead so that the statistics show matching numbers of calls scheduled in the campaign and calls actually made.
The maximum number of attempts set, for example, to four means that if a call is finished before the fourth attempt, the system does not reschedule any other calls.
Search
You can search among the campaigns displayed by name, state or project.
The name occurrence is searched anywhere and it is not case sensitive. The search does not support wildcards. For example, when searching for “ma”, you will see campaigns named “Manual”, “manual” (the initial letter matches), “Semanuel”, “SeManuel” (a middle match), “Chroma”, “chroma” (end match).
The state and project are simple drop-down lists.

Edit
Select a campaign.
Edit the form with campaign details.
Save using the Save changes button. The number on the save button indicates the number of changed campaigns that will be saved when pressed.
Remove
There are two ways to delete campaigns that you no longer need:
Delete the currently selected entry by pressing Delete outbound lists.
To delete multiple entries, first select them by checking the boxes on the left in front of the name in the list and then press Delete outbound lists.
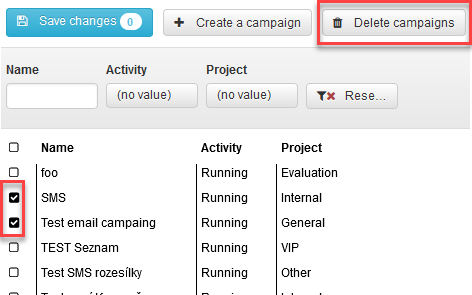
Deleting removes all calls in the Prepared or Paused state from the database, those not executed in the Scheduled state will be marked as Cancelled.
Creating a CSV file for import
The most common and easiest way (though not the only) to schedule calls for a campaign is to import them using a CSV file.
Preparing a suitable CSV file means that you need to know what you want to import. The following section describes the columns that may appear in the CSV file. You can find columns from the basic category in each CSV. Optionally, you can add more recognized columns. If you link a campaign to a scenario and want to pre-populate some (or all) of the responses from the imported data, the additional columns will match the elements of that scenario.

Basic columns
Column |
Meaning |
|---|---|
|
Telephone number.
|
|
Any text associated with the called party, such as their name. It is used as the call name.
|
|
A point of time before which the call should not be made.
|
|
One-time or repeated call scheduling.
If the call should only be scheduled once, enter
|
|
Start of the time window from when calls will be scheduled.
|
|
End of call scheduling time window.
|
Columns for scenario fulfillment
If you associate a campaign with a scenario and want to pre-populate the results with the imported data, the additional columns will match the scenario elements. The pre-prepared responses are usually validated by the customer and appear as ScenarioResultValue results after the import.
Caution
The column name and its order in the CSV file must be exactly the same as Target column and Rank in the list of elements on the screen.
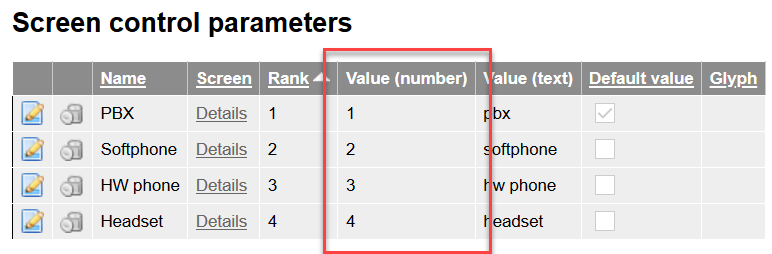
Example: If the scenario screen has the following elements:
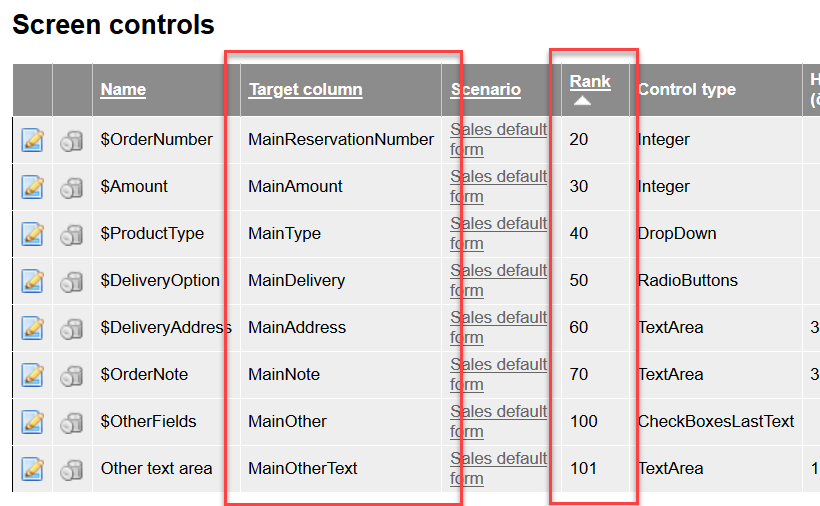
Then in the CSV file you may see one or more columns named MainReservationNumber, MainAmount, MainType, MainDelivery, MainAddress, MainNote, MainOther, MainOtherText.
However, their order in the on-screen list cannot remain the same because the order would not match the Rank and the column order in the CSV import.
For example, if you only used Number from the basic columns, none of the other columns, and you want to pre-fill the values just for MailReservationNumber and MainAmount from the on-screen elements, you must modify their Rank as follows:
Change
MailReservationNumberfrom 20 to 3Change
MainAmountfrom 30 on 4
The resulting CSV file would then look like this:
Number;MainReservationNumber;MainAmount
0267008761;1717719;2999
0467501780;1717718;2980
0124122730;1717720;2999
The value of the column in the CSV file becomes the default response of the element. For elements of the DropDown type, the value in the column must match Value (number) of the list value.
After a successful import, the default responses become values in ScenarioResultvalue.
Importing a CSV file
The import itself is simple, but there are a few things to watch out for:
Columns – Use the options as described above.
Suffix – You need to use
.csv.Encoding and separator – When importing, select the same encoding page and separator that you used when creating the file.
If you met the conditions, you can perform the import:
In FrontStage administration in the section, fill in the form as follows:
Field
Description
Outbound campaign
Select the appropriate outbound campaign. If you landed on the form from a campaign, it is pre-selected.
Separator
Select the same separator character that you used when creating the CSV file.
Encoding
Select the same encoding you used when creating the CSV file.
Scenario
To associate an import with a scenario, select it from the Scenario drop-down list. Otherwise, select (None) from the drop-down list.
Calendar mode, From, :guilabel: To
These fields are only used when there are no
TimeMode,TimeToandTimeFromcolumns in the CSV file.Direct selection
If the import contains the
AgentIdorSystemNamecolumns, they will be selected as direct agent selection.Import only as ready
Check this box if you do not want the calls to be distributed but wait for the New phase.
Select the file on your computer using the Browse… button.
Click on the Import button to start the import.
Starting and stopping a campaign
In order to distribute outbound campaign calls, agents must be available in the project defined for the campaign, especially those with the appropriate level of proficiency required in the campaign project and outbound call channel:

Check also their skill levels; they need to be logged in as ready to receive calls etc.
At startup, calls switch to the Scheduled state.
To actually start your campaign, perform the following steps:
Select a campaign from the list.
On the Detail vertical tab, set the campaign state to Running.
Go to the Outbound List imports vertical tab and select importing from the list that you want to use to make calls.
Press Start calling (or Stop calling to stop).
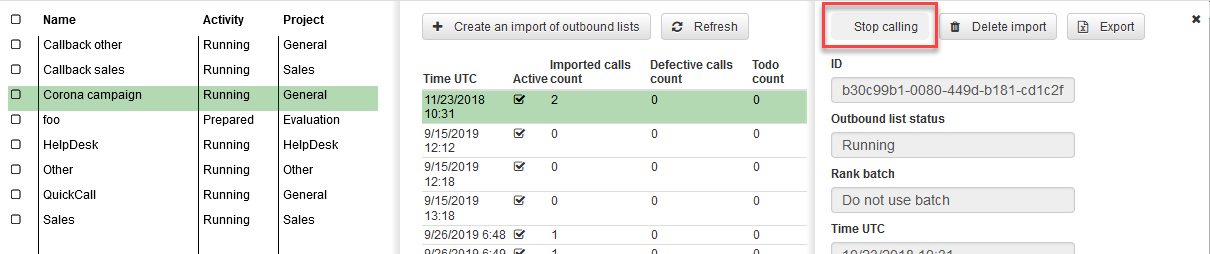
Call distribution will begin.
Exporting calls and replies
For each call import, you can request the export of calls and form results (scenario values).
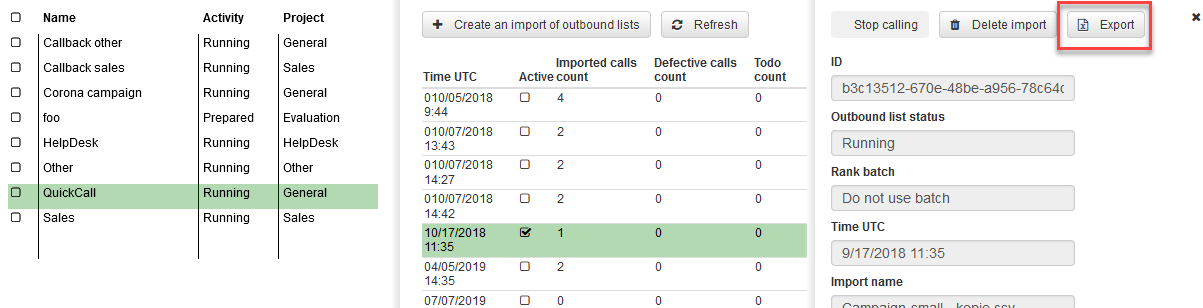
Select a campaign from the list.
On the Outbound List imports vertical tab, select importing from the list that you wish to export.
Press Export.
Check the columns that you want to export.
The available columns are divided into two parts:
The Export choice - field call section with names of basic and other recognized columns.
The Export choice - field scenario section with the names of columns to fill the scenario (if there were any for the given import).
Use the Export finished radio button to choose whether only completed calls should be exported.
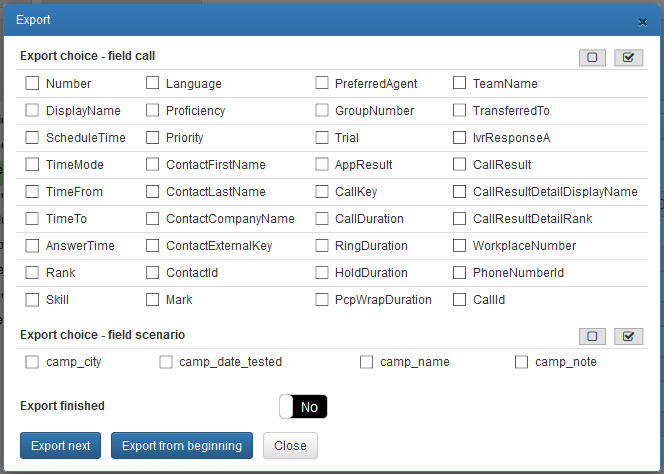
To start the export, press Export all (from the last export location, it continues) or Export from beginning (everything from the beginning).
The export runs in the background. You will see the progress in the same dialog. There may be more exports shown here. You can download the export that has already been completed. You can delete the export in any state.
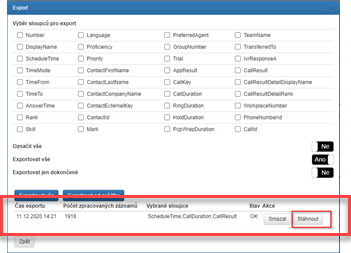
You can close the dialog with the button before the export is completed. You can check the processing status by calling up this dialog again.
Progress monitoring
You can see how many calls you still need to handle in the campaign in the administration section in the Calls to be processed field.
You can monitor the import status, the number of rows already imported, faulty rows (with error), and export the values of basic and other recognized columns to a CSV file in the import detail view.