Message campaigns
The visual message campaign editor is a tool for the supervisor (or admin) to create and edit campaigns for sending bulk SMS and emails.
The editor can be found in the FrontStage administration, section . You must have permission EditCampaign and possibly ImportMessage to work with imports.

Note
Configuration parameters affecting the editor function: CampaignAdminQueryId, CampaignAdminCampaignImportsQueryId, CampaignAdminBulkMessageImportsQueryId.
The running editor displays a list of all message campaigns.
In the upper right corner there are buttons for interacting with the records. Press Create to open a pop-up window where you enter a name and queue, confirm to go to the form.
The Detail tab
ID - System generated GUID.
Display Name - You have filled it in before, editable.
Activity - Current state in terms of upload progress. The default is Prepared.
Queue - The queue for which it is sent out.
Description - Advanced description/note.
Language Language of the text to be sent (can be part of the template).
Template If selected, the message content is pre-filled according to it.
Gateway for sending. If not specified, the first gateway according to sending conditions will be used.
Campaigns tab
The tab uploads a list of recipients to send the campaign to and work with these lists. It is possible to send one campaign to several different mailing lists.
The open tab represents the history of imports and their status.
Importing a file
To create an import, press Create in the header. A window will appear where you enter the import parameters.
Campaign - Pre-populated with the campaign you are running the import from. Invariant.
Delimiter - Character that will be taken as a column separator in the context, for csv the semicolon is typical.
Encoding - Encoding type (character set).
Note
You can set available encodings for your installation. For more info see Encoding localization.
Import as draft - If enabled, reports will be created in the Draft phase ( they will not be sent).
Scenario - Form used for campaign purposes, see. Multiple parameters.
File path - Path to the local import file.
Download CSV template - You can download a template where the available columns are visible and the necessity to fill them is described. Use this button when you first import your campaign, then you can import your completed file.
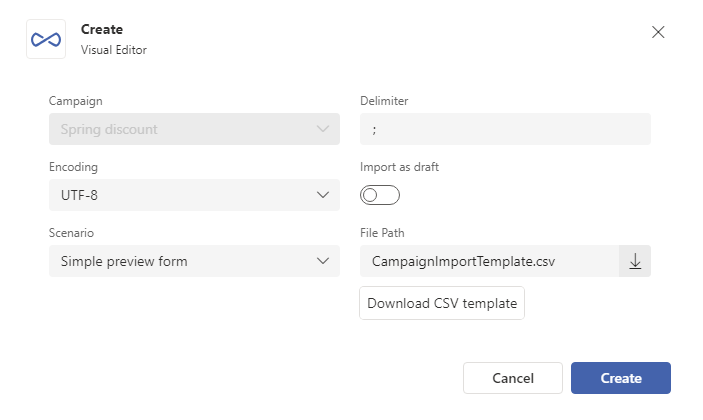
To start importing contacts, press Create, displayed in the open window.
Important
Messages are imported on behalf of the agent doing the import if the AgentId or SystemName column in the CSV file is not filled in. There must be a message template that governs the message type and content. This is set for the campaign. If there is no template, the message type is controlled by the gateway and messages will have an empty body, for SMS only the subject (Subject column) from the import is used. If the template sets the language, this is used; otherwise, the campaign language is used or left blank.
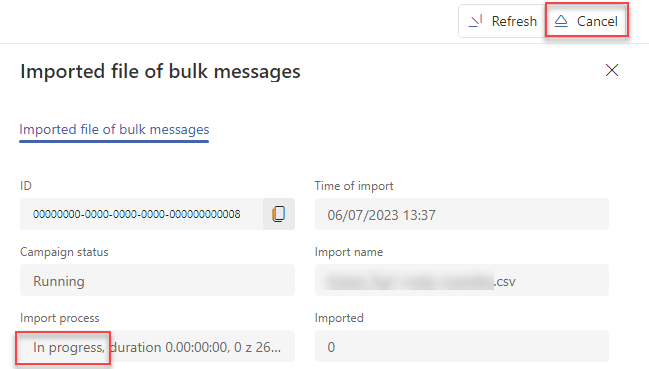
You can then see the result and related actions in the detail of the specific import you open from the tab. You can also cancel a pending import in the detail.
CSV file
Important
The principles of proper file creation are already described in another article.
Column |
Meaning |
|---|---|
|
E-mail addresses or a phone number for the “To” field, separated by a comma or semicolon; if it overlaps with a separator in CSV, it must be put in quotation marks; for tasks it should correspond to the text in the AgentId field; a required column. |
|
E-mail addresses for the “Copy to” field, separated by a comma or semicolon; if it overlaps with a separator in CSV, it must be put in quotation marks; an optional column. |
|
E-mail addresses for the “Blind copy” field, separated by a comma or semicolon; if it overlaps with a separator in CSV, it must be put in quotation marks; an optional column. |
|
The e-mail subject - If it contains a CSV separator, it must be in quotation marks; if it contains quotation marks, they must be duplicated; it may contain macro-fields; for SMS, the column is used as the message text if no template is specified; a required column. |
|
Message priority (influences sending rules); an optional column. |
|
A point of time before which the message should be sent; an optional column. |
|
A plain text that can be used as the |
|
Contact ID (GUID) with which the message is to be associated; an optional column. |
|
An external contact key, an alternative entry instead of ContactId; if both are specified, ContactId prevails; an optional column. |
|
An integer (int) that makes it possible to mark messages; an optional column. |
|
An ID (GUID) of the agent for whom the message is to be imported; an optional column. |
|
The agent login name (typically in the format domainnames), an alternative entry instead of AgentId; if both are specified, AgentId prevails; it is an optional column. |
|
An external message key; an optional column. |
|
A title of the column in the associated form. |
Working with the import
The detail contains information:
ID - System generated GUID.
Time of import - An indication of when the import was started.
Campaign status - Reflects the settings of the Detail tab, immutable.
Import name - Imported file name.
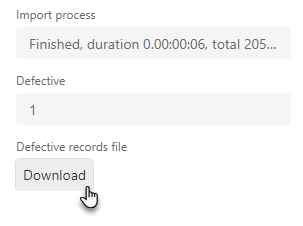
Import Process - Information about the status, duration and size of the data.
Imported - Number of contacts imported correctly.
Defective - Number of contacts that were not imported.
Defective records file - Detailed listing of defective import items. After some time, it may no longer be available, see. “Import on the on-premise server”.
Result report file - Detailed listing of the import progress. After some time, it may not be available anymore, see. “Import on the on-premise server side”.
Processing recapitulation - The history of actions associated with sending to this recipient list.
Import on the on-premise server
For a better understanding and if you are solving any problems, we are going to describe how the import works on the server side.
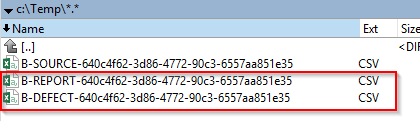
The ServiceBulk service needs to be running for imports to work. On the computer with this service, a folder is created in the path specified in the
ImportFolderparameter of this service (usuallyC:\TEMP).After uploading the CSV file, we would find the original file, a report on the processing progress and a copy of faulty lines in this folder.
The original file is renamed to
B-SOURCE-<id>.csv. A corresponding report will be created:B-REPORT-<id>.csvand the faulty lines will be inB-DEFECT-<id>.csv.If no error occurred, the faulty file will contain only the first line of the header.
If an error occurs, you will find its cause in the report and the faulty line in the fault file.
By default, these files are temporary and can be deleted by the server administrator at any time (e.g. to save disk space).
Sending
To start sending a campaign, press Start sending. Activating it will switch the messages to the Scheduled state. Sending is also indicated in the import list by the  flag in the Active column. You can see the progress in the Processing Recapitulation list, but there is no automatic data refresh over time, so press Refresh for the current status.
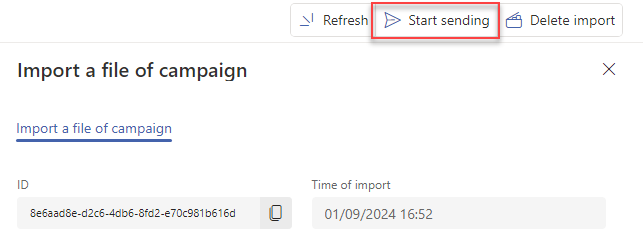
Pressing Stop Sending will stop the ongoing campaign.
If errors occurred during processing, you can download a file with a copy of the faulty (defective) lines in the import detail using Download button. The same goes for a file with a log of (report on) the processing.
Deleting
You can delete a specific contact import from the detail using Delete import. Deleting removes all messages in the Draft phase from the database, and changes unsent messages in the Scheduled phase to Cancelled.
Parameterized campaigns
All messages sent within a bulk campaign can be the same, but more often you want to customize various elements in each message, such as the address, remind the recipient of their status of points and similar variable data. Such campaigns are called parameterized campaigns.
One parameter
If you only need one parameterized element in the whole report, the situation is simpler. In the CSV file, specify this variable in the Parameters column. In the message template, use the $Parameters placeholder at the desired location where the variable should appear.
Example of a CSV file and template for a parameterized campaign with one parameter
CSV file:
To;Subject;Parameters
foo@atlantis.cz;"Last minute offer";"Mr. Foo"
bar@atlantis.cz;"Last minute offer";"Mrs. Bar"
Template body:
Dear $Parameters$!
This summer is going to be ...
Multiple parameters
If you need more variables, you must create an appropriate scenario. The scenario field must match the column names in the CSV file.
You can still use the Parameters column and the $Parameters placeholder along with the scenario.
Example of preparing a campaign with multiple parameters
Prepare a report template and use variables corresponding to future parameters.
Dear $Parameters$!
You have $ResultNumber:BonusPoints$ bonus points. Don't let them expire!
...
Create a scenario and a screen with the necessary fields - in our example, it is the
BonusPointsinteger field.Create a campaign as instructed above.
Prepare a CSV file and import it according to the instructions above.
To;Subject;Parameters;BonusPoints
foo@atlantis.cz;"Last minute offer";"Mr. Foo";4001
bar@atlantis.cz;"Last minute offer";"Mrs. Bar";3810
Start the sending according to the aforementioned instructions. Two emails will be sent:
Dear Mr. Foo!
You have 4001 bonus points. Don't let them expire!
...
and:
Dear Mrs. Bar!
You have 3810 bonus points. Don't let them expire!
...
Bulk messages tab
The controls and logic of the editor tab are the same as for the campaign. However, there is a fundamental difference in the understanding of a campaign and a bulk message, which you must know to use correctly.
What is a bulk message?
Bulk message is another way to send messages to recipients. Unlike a campaign, where each message can be different and macro-expansion of the messages can be performed, a bulk mailing is designed for messages that are the same, do not contain attachments, and are always sent to a single recipient.
For bulk messages, only the most essential data in the BulkMessage table is stored in the database. The purpose is to enable the distribution of a significantly larger number of e-mails when it is not necessary to monitor in detail the origin of the message and its sending, and the specific text of the message need not be maintained.
Bulk message settings are based on the Detail tab information. To make it work, you must create it as follows:
Field |
Description |
|---|---|
Name |
Name for administration. |
Description |
Subject of sent messages. |
Queue |
Mandatory, but bulk messages do not use it. |
Gateway |
The gateway (must be outbound or bidirectional) through which all messages will be sent (sending rules are not used). |
Template |
It must be the TmpEmail template for an e-mail message, or the TmpSMS template for an SMS message. The message body is used from it. |
Bulk messages are sent only for messages for which:
The campaign is in the “Scheduled” status and is not deleted.
Import (BulkMessageImport) is set to Active=1, Deleted=0
Message (BulkMessage) has Activity=0 (Ready) (sent messages have this field set to 1; if an error occurred, there is a negative number in this field, where the last 3 digits represent the SMTP error code).
The iCC.ServiceBulk service is running
Bulk message imports
The following conditions must be met when importing messages:
The import is always performed into a bulk campaign, where the queue and the report template are filled in.
There is a message template that controls the type of messages and their content, which is set for the campaign; for e-mail messages the
TmpEmailmessage type must be created, for SMS messages theTmpSMStype.If the template contains the Language field, then it is applied; otherwise, the language defined in the campaign will be used, or it will remain blank.
If the campaign does not contain a defined gateway, the first gateway according to the sending rules will be used.
All messages are imported into the Draft phase (i.e. they are not sent).
Messages are imported for the agent who performs the import unless the
AgentIdorSystemNamecolumn is filled.
File format
This is a standard CSV file with an optional separator that has the following columns:
SMS format:
Column |
Meaning |
|---|---|
|
A phone number for the “To” field (only one number per line); a required column. |
|
Contact ID (GUID) with which the message is to be associated; an optional column. |
|
An external contact key, an alternative entry instead of |
E-mail format:
Column |
Meaning |
|---|---|
|
An e-mail address for the “To” field (only one address per line); a required column. |
|
Contact ID (GUID) with which the message is to be associated; an optional column. |
|
An external contact key, an alternative entry instead of |
Example of a CSV file for importing email bulk messages
Email;ContactId;ExternalKey
foo@info.com;99b69847-9d96-4faa-ac1f-049eff8e9ee4;tx789a6v
abc@info.com;d8aff8d5-f86d-4a8c-9079-0cfe5cfeb25f;
abcd@info.com;;2|8155031214|1
guid@atl.com;d8aff8d5-f86d-4a8c-9079-0cfe5cfeb22f;